
ACCOUNT SETUP GUIDE
Everything you need to know about DIGI5Y set up to grow faster, smarter, and without the chaos.
As an account user. Once you had logged in and verified your account. You will receive Digi5y online tutorial invitation.
It is highly recommended that you take some time to watch and review the admin tutorials before setup.
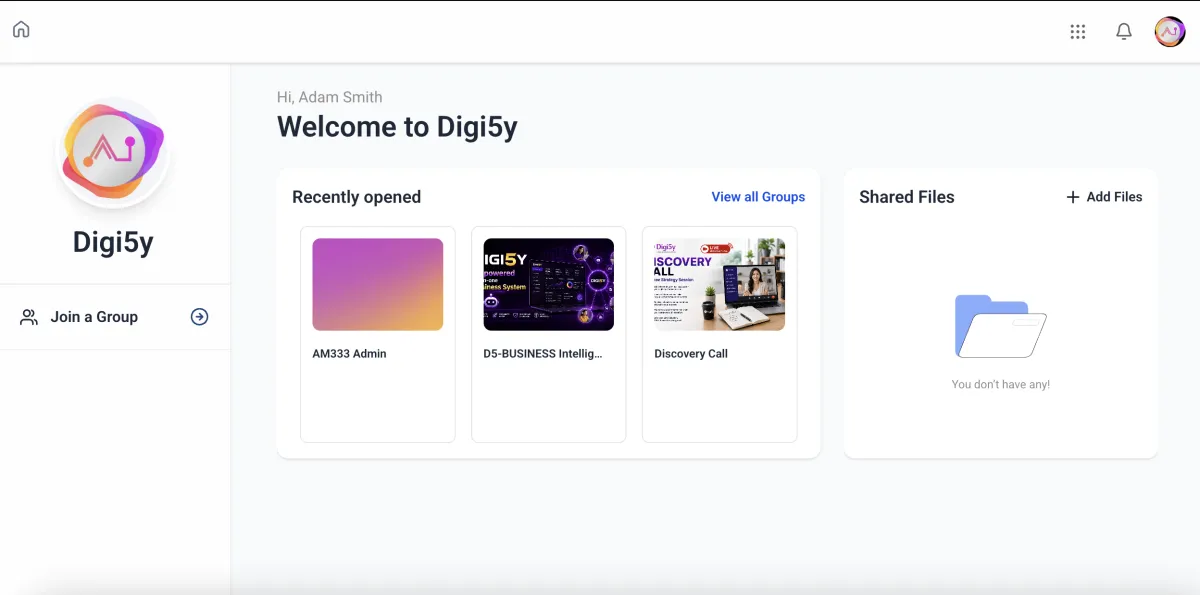
Log in to the DIGI5Y Community to access your admin tutorials.
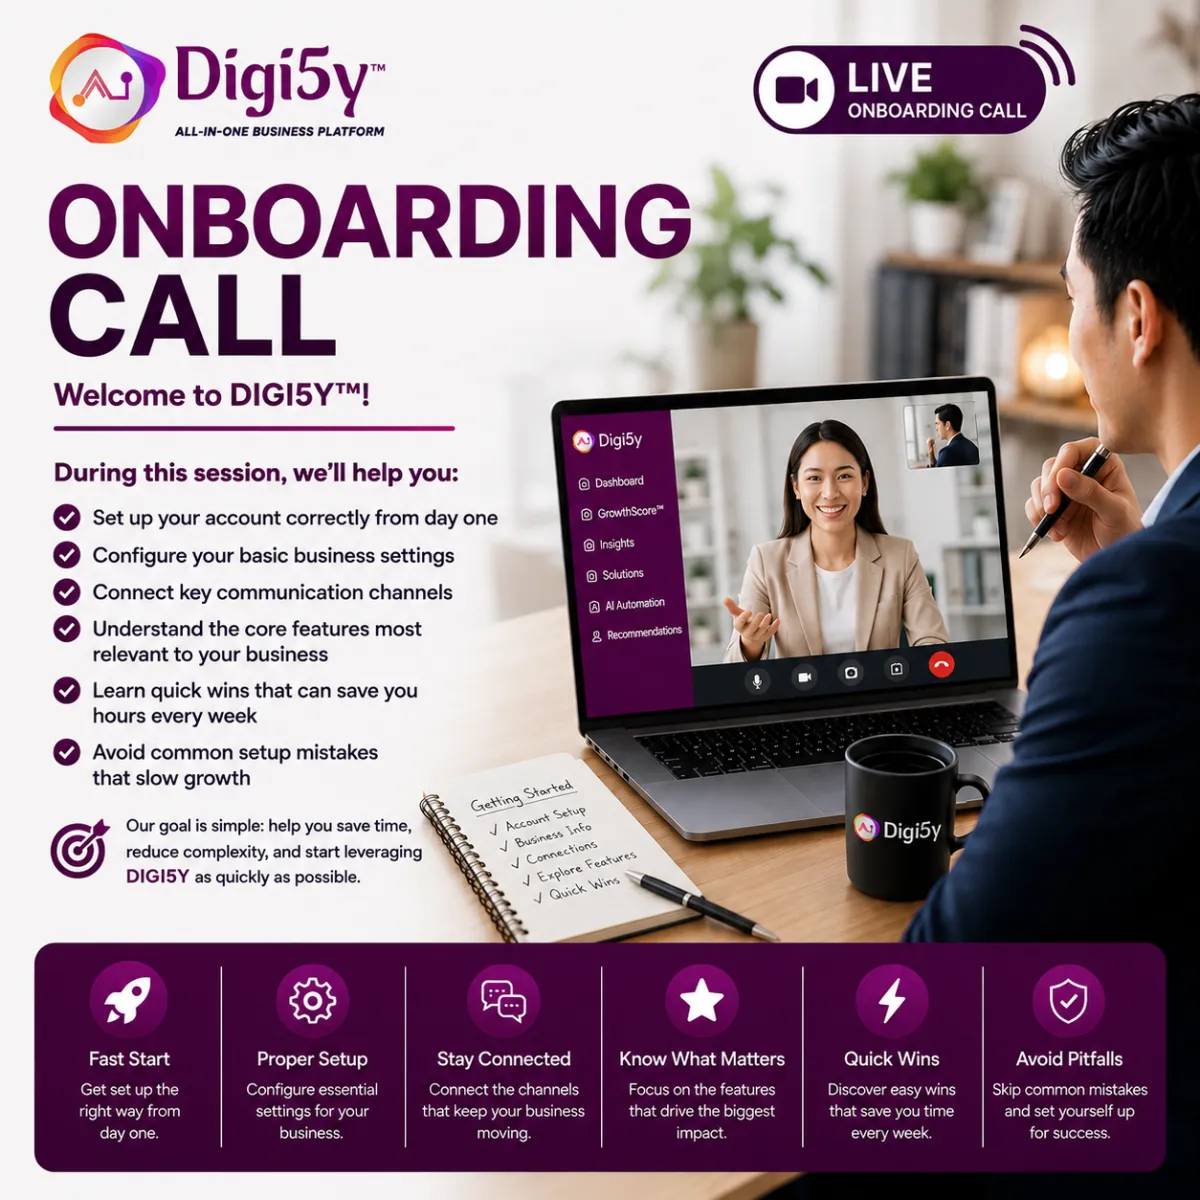
Haven't Set Up Your Account Yet? Start Here
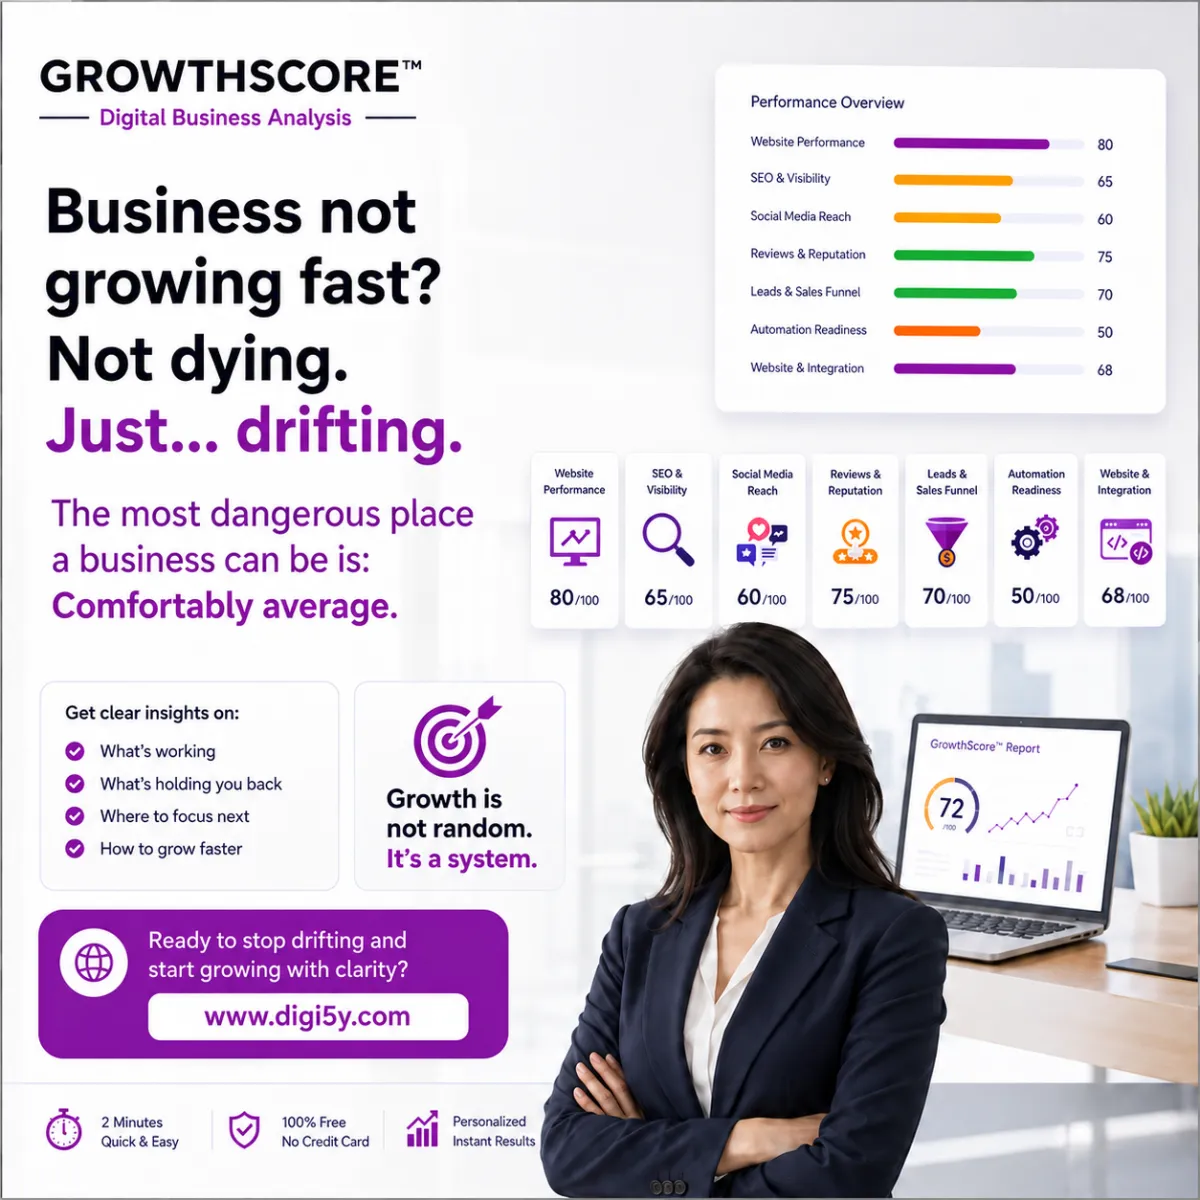
Discover Where You're Losing Leads - For Free
PART 1 : FOUNDATION SETUP
These are the first things to configure so every other part of the account works correctly.
1. Complete the Launch Pad
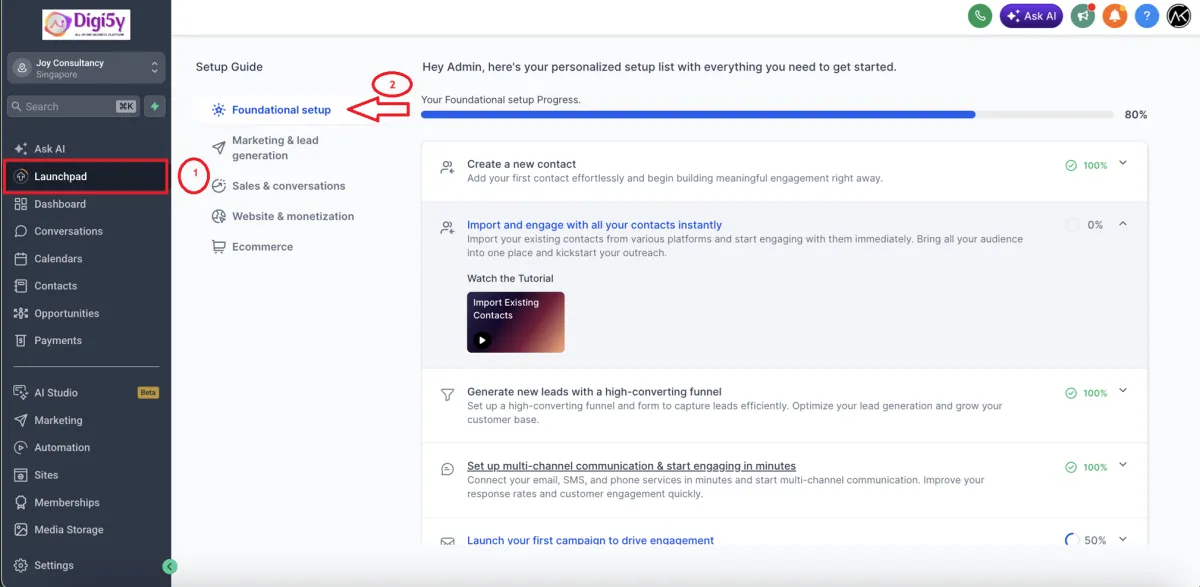
The LaunchPad presents short video tutorials for essential setup steps, helping you get started quickly and correctly.
Log in to your DIGI5Y account.
1. Locate the LaunchPad section on your dashboard.
2. Click on each action relevant to your needs.
3. Watch the short tutorial video for that step.
4. Complete the setup task as shown in the video.
5. LaunchPad automatically tracks your progress as you finish each task.
2. Business Profile Setup
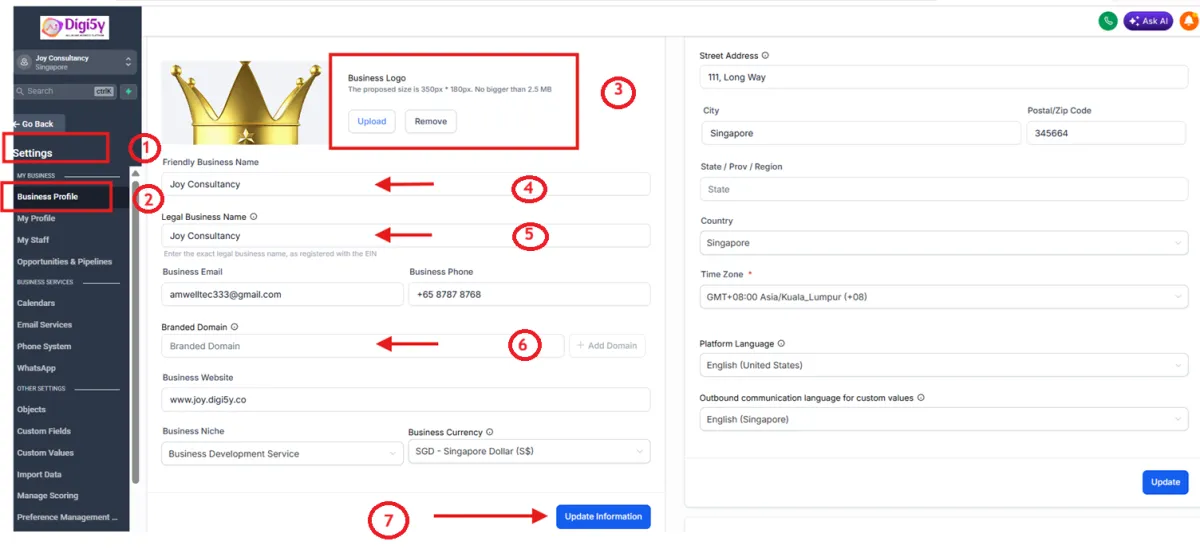
Updating your business information here is important because it automatically feeds into your website, invoices, and emails.
1. Go to “Settings” > “Business Profile”
2. Add your Business Logo
3. Fill in any missing fields (address, phone, timezone, etc.)
4. Click the “Update Information” button after each change
3. Add Staff & Team Members
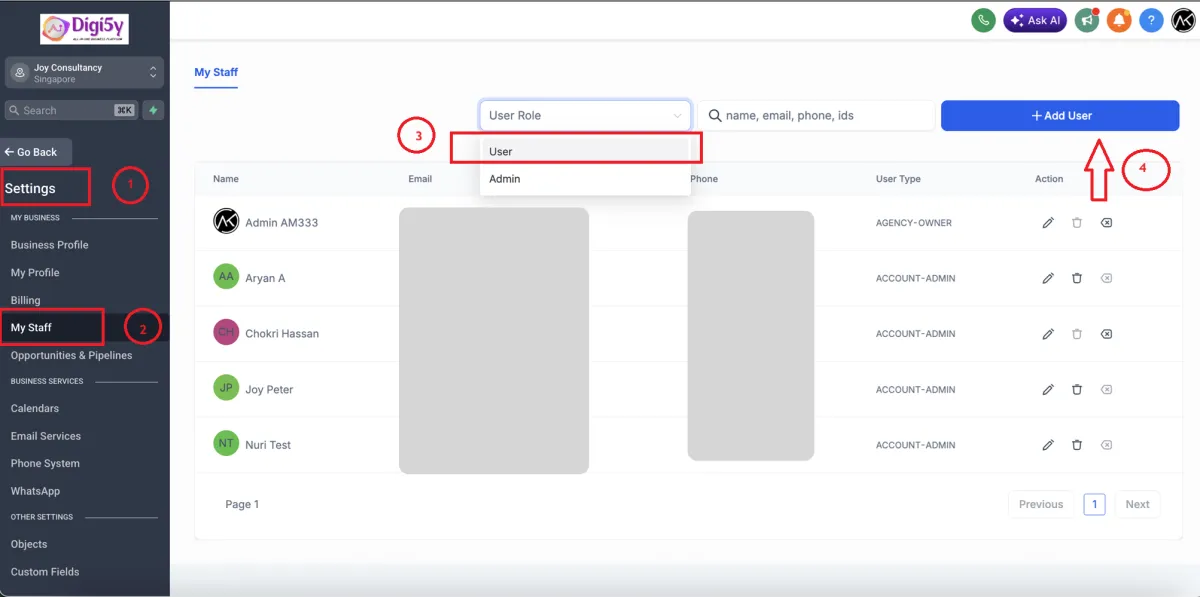
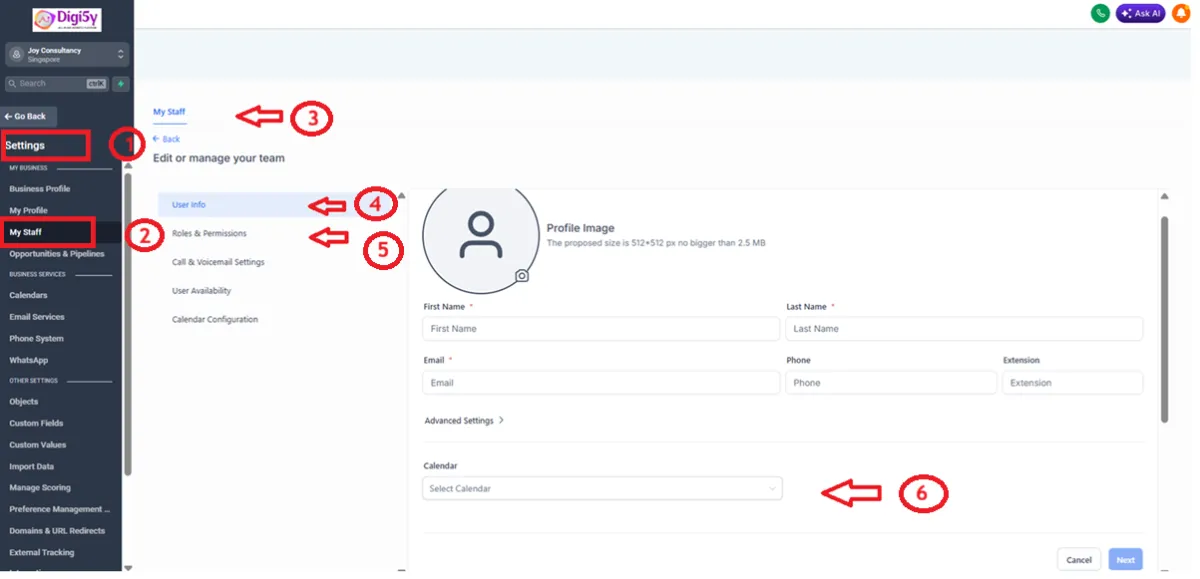
Create a login profile for every team member who provides services, so they can manage their own calendar and conversations.
1. Go to “Settings” > “My Staff”
2. Click “Add Employee”
3. Enter the user's information
4. Assign the Calendar this user should handle
5. Click “Save”
6. Note: each staff member must log in themselves once to connect their personal Google Calendar
4. Setup Phone Number & A2P Verification
Purchase a number to send/receive calls and texts, and complete A2P verification so your SMS messages are not blocked as spam.
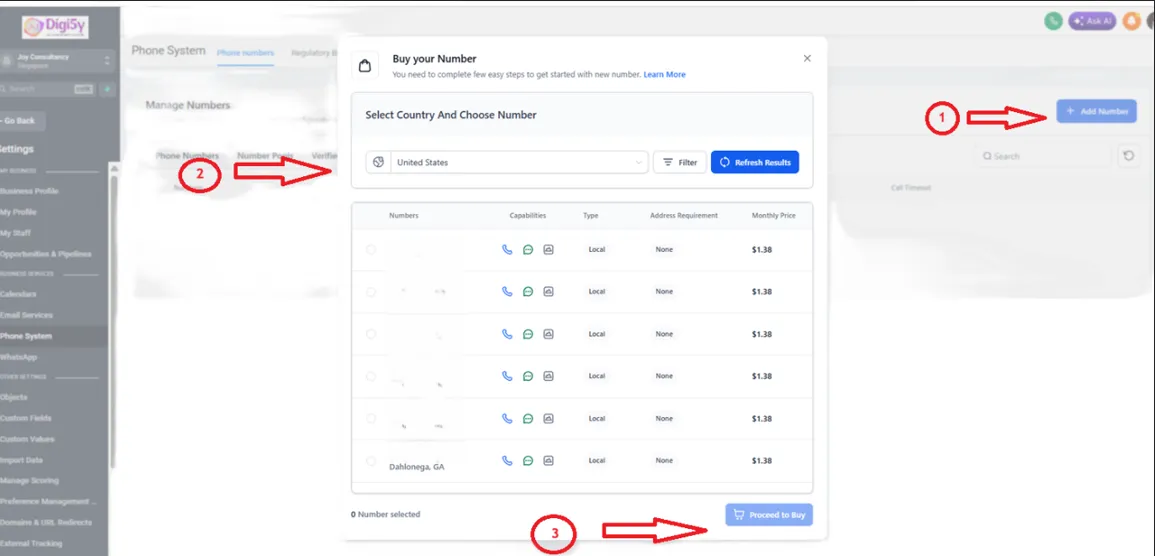
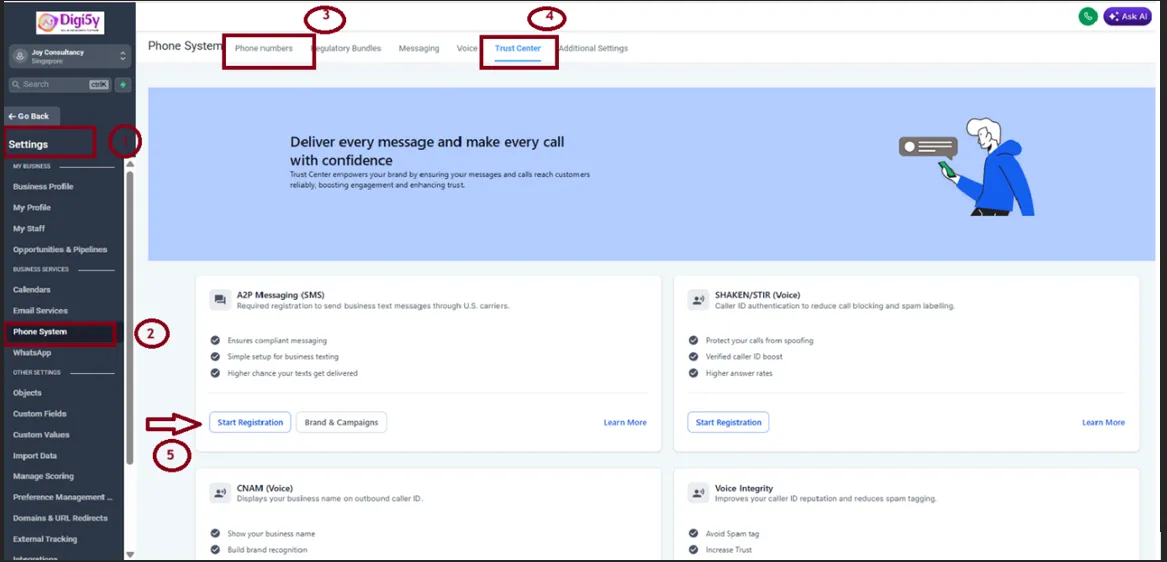
1. Go to “Settings” > “Phone Numbers”
2. Click “Add Number” > “Add Phone Number”
3. Filter by your Area Code and select a number
4. Click the pencil icon to configure call forwarding and call recording
5. Go to the “Trust Center” tab and click “Start Registering Now” to complete A2P Verification
For businesses outside the US:
Steps 1–4 remain the same (purchasing and configuring your number). However, A2P verification (Step 5) is specific to the US telecom system. If your business is based in another country, please check your local telecom/SMS registration requirements instead, as compliance standards for business messaging vary by country.
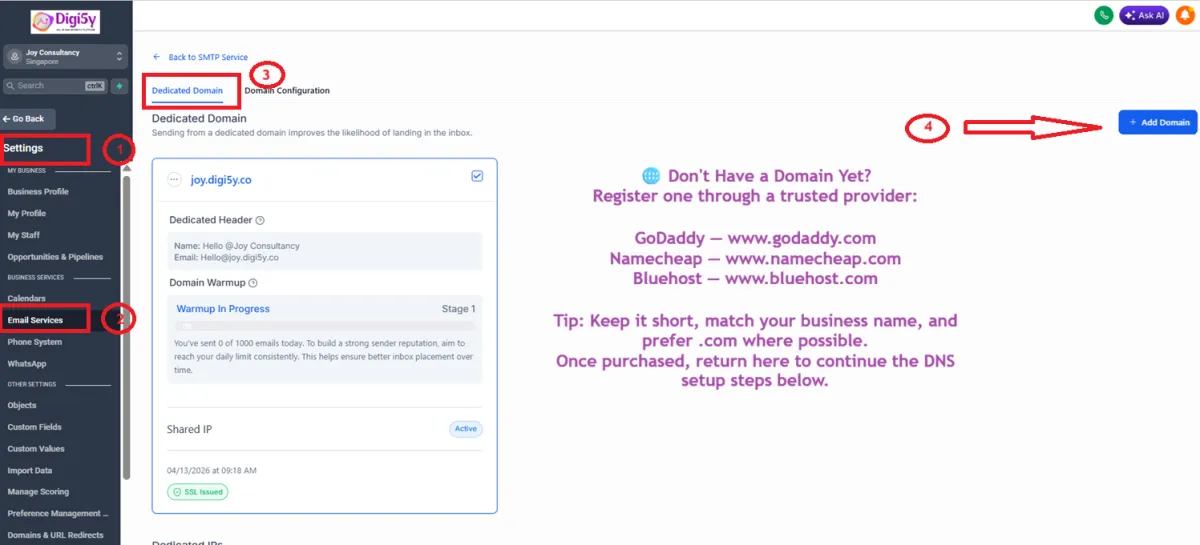
5. Setup Dedicated Email Domain
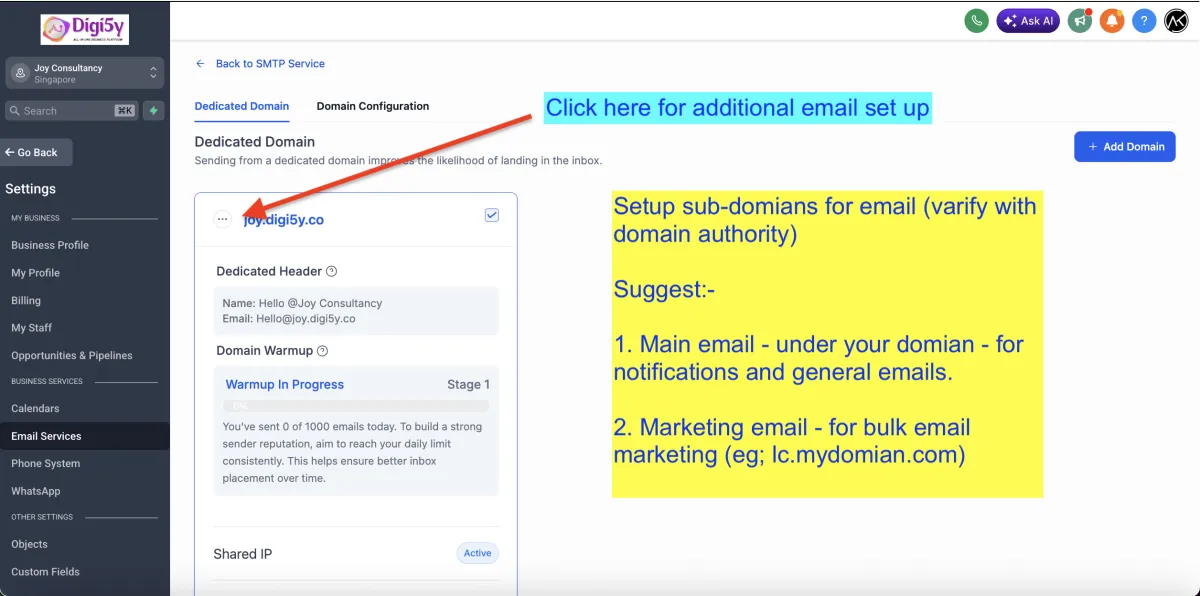
A dedicated sending domain (e.g. mail.yourdomain.com) keeps your marketing emails out of spam folders.
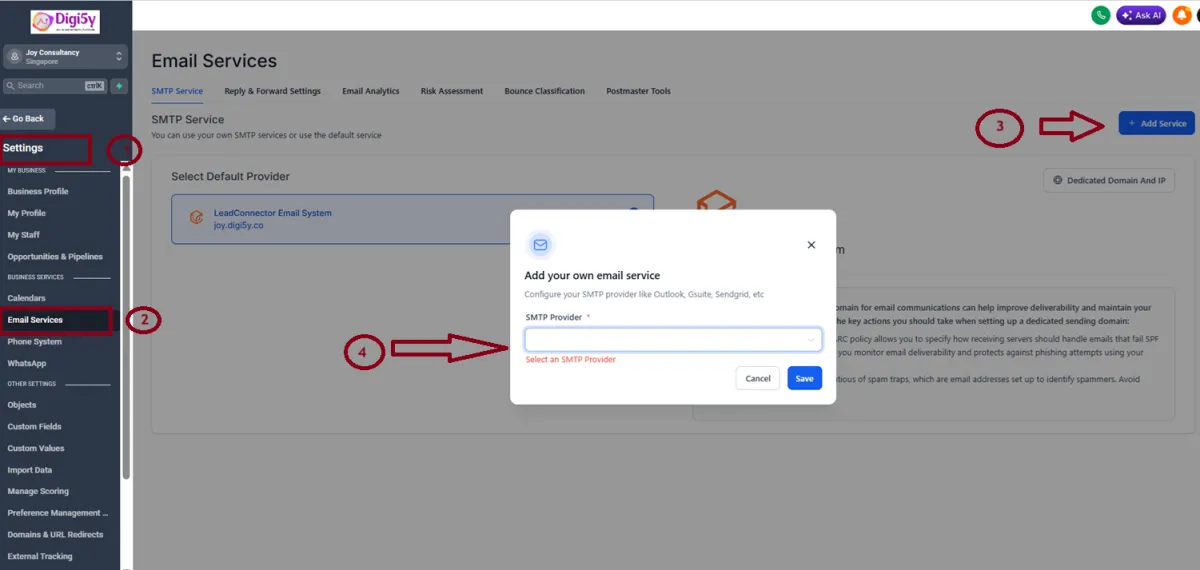
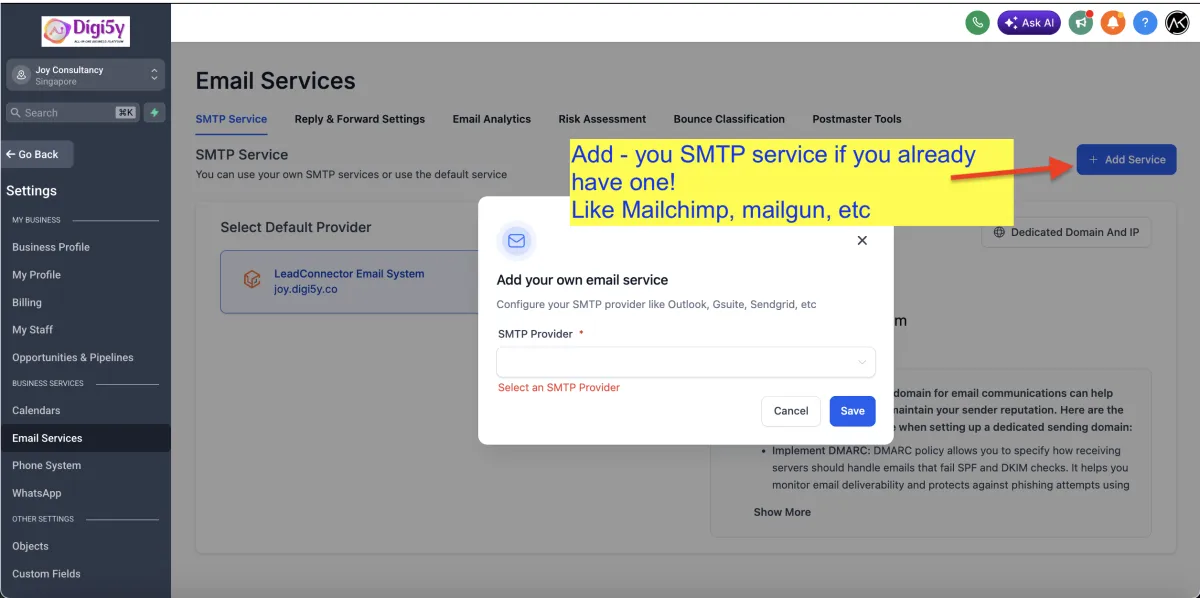
1. Go to “Settings” > “Email Services”
2. Click “Create Dedicated Domain”
3. Enter your desired sub-domain (e.g. mail.yourdomain.com)
4. Click “Add & Verify”, then “Continue” to connect DNS records
5. Click “Verify Domain” until all records show as verified
6. Setup Branded Domain
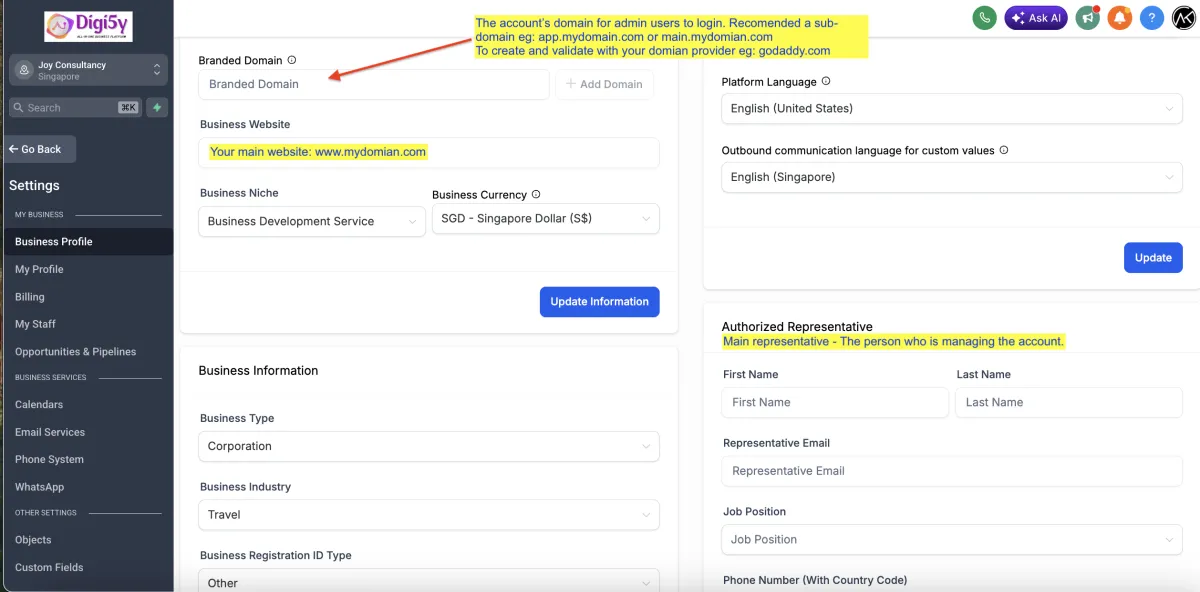
Replace the default system link (e.g. link.myagency.com) with your own branded link (e.g. link.yourbusiness.com) on documents, invoices and calendars.
1. Go to “Settings” > “Business Profile”
2. Add your sub-domain in the “Branded Domain” field
3. Add the required CNAME record in your domain's DNS settings
4. Wait 60 seconds, then click “Update Information”
PART 2 : CONNECT YOUR CHANNELS
Connect your social and communication channels so leads can reach you everywhere.
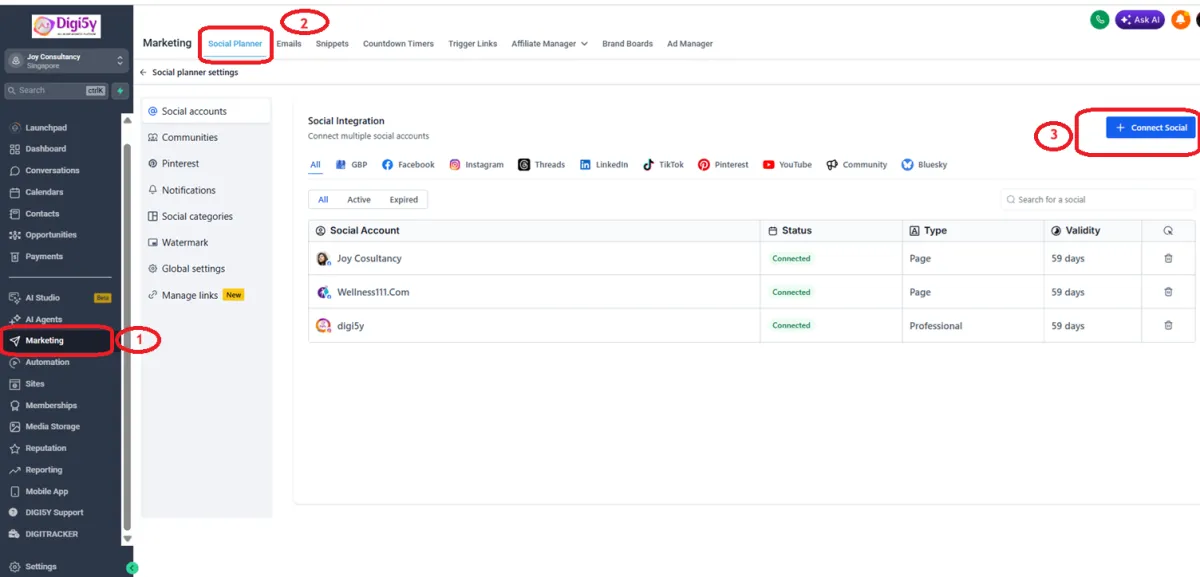
7. Connect Social Planner Networks
Social Planner lets you post and schedule content across multiple platforms from one place.
1. Go to “Marketing” > “Social Planner”
2. Follow the on-screen steps to authorize each account
3. Note: you need admin access to each social account you connect
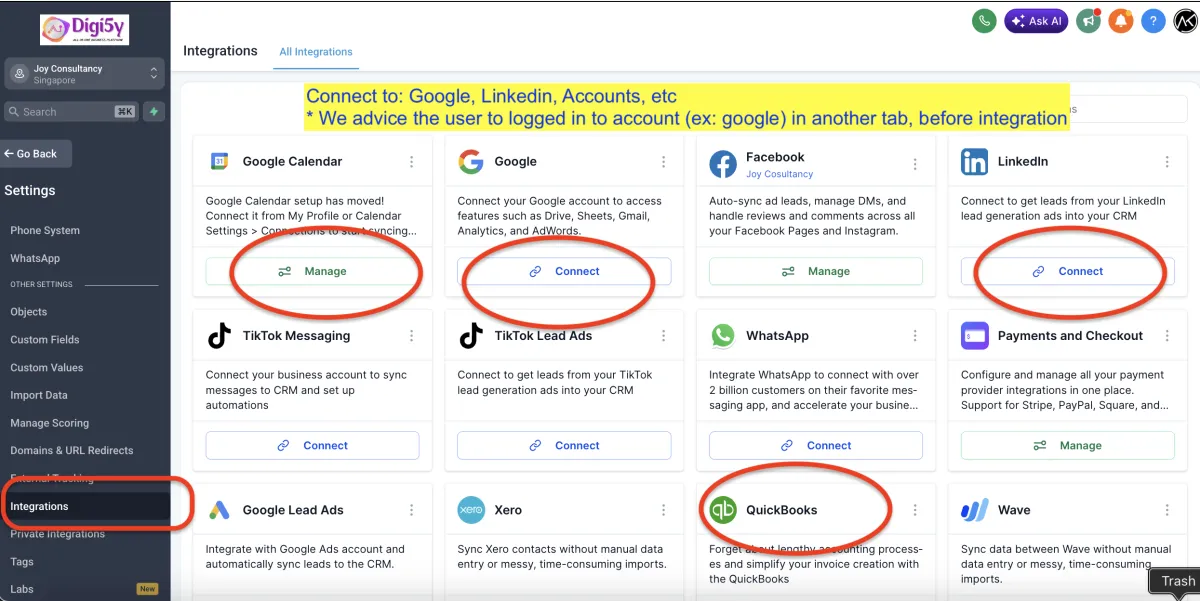
8. Connect Facebook Page & Instagram Account
Connecting these activates Facebook Messenger, Instagram DMs, and review management inside the platform.
1. Make sure your Instagram profile is a Business account linked to your Facebook Page
2. Go to “Settings” > “Integrations”
3. Click “Connect” under the Social option
4. Select your Facebook Page and click “Connect Facebook & Instagram"
9. Connect Google Business Profile
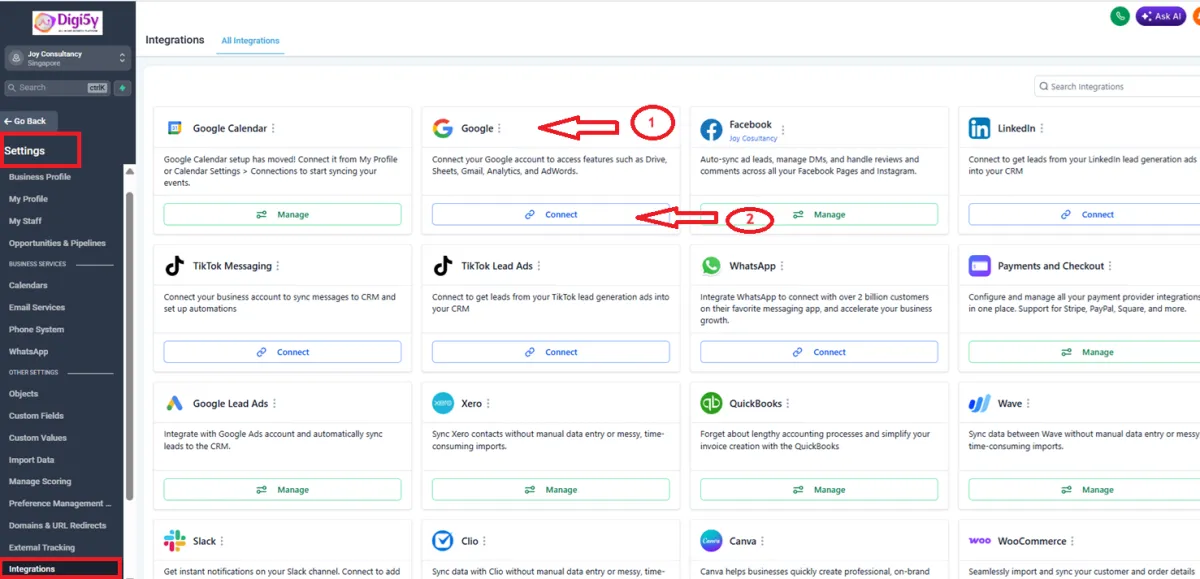
This activates Google Review management, Google Business Messaging, and auto-inserts your DIGI5Y phone number into your Google listing.
1. Make sure your Google Business Profile is created and verified
2. Go to “Settings” > “Integrations”
3. Click “Sign in with Google” and select the correct account
4. Select the business to link and check “Enable GBP call tracking”
5. Click “Connect”
10. Setup Message Templates (Snippets)
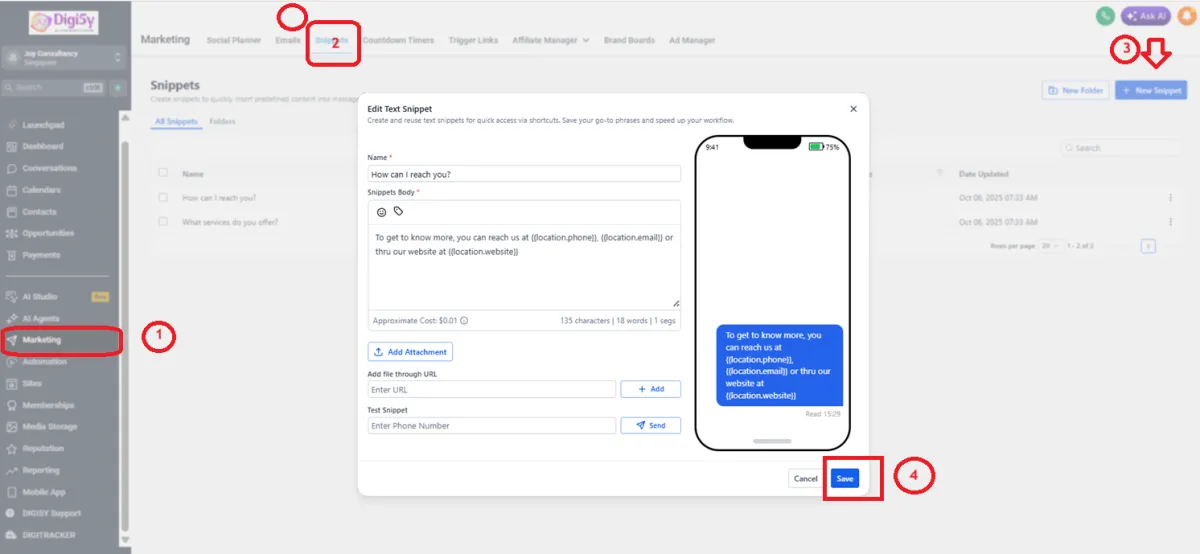
Snippets are pre-written replies for frequently asked questions, saving time on repetitive conversations.
1. Go to “Marketing” > “Templates (Snippets)”
2. Click “Add Template” and choose Text or Email
3. Name it, compose the message, and add custom values to personalize it
4. Click “Save".
PART 3: PAYMENTS & REPUTATION
Set up how you get paid and how you manage your online reputation.
11. Connect Stripe & Create Products
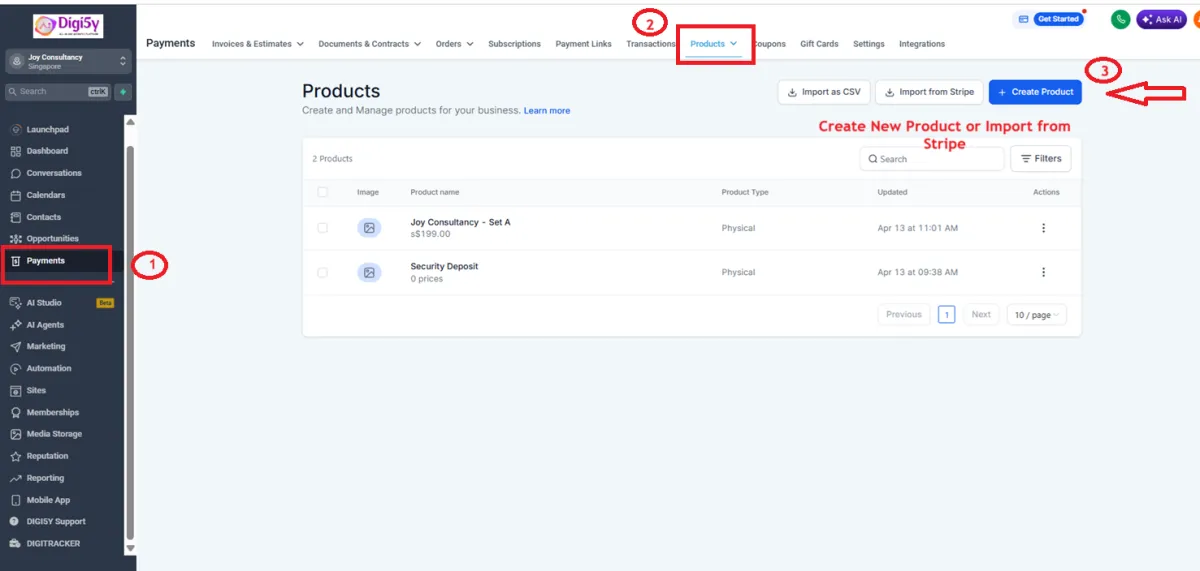
Stripe integration lets you accept payments on your website, funnels, and calendar bookings.
1. Connect your Stripe account under Payments settings
2. Go to “Payments” > “Products”
3. Click “Create Product”, or “Import from Stripe” if products already exist
4. To bulk-import from another platform, download the sample CSV and fill it in
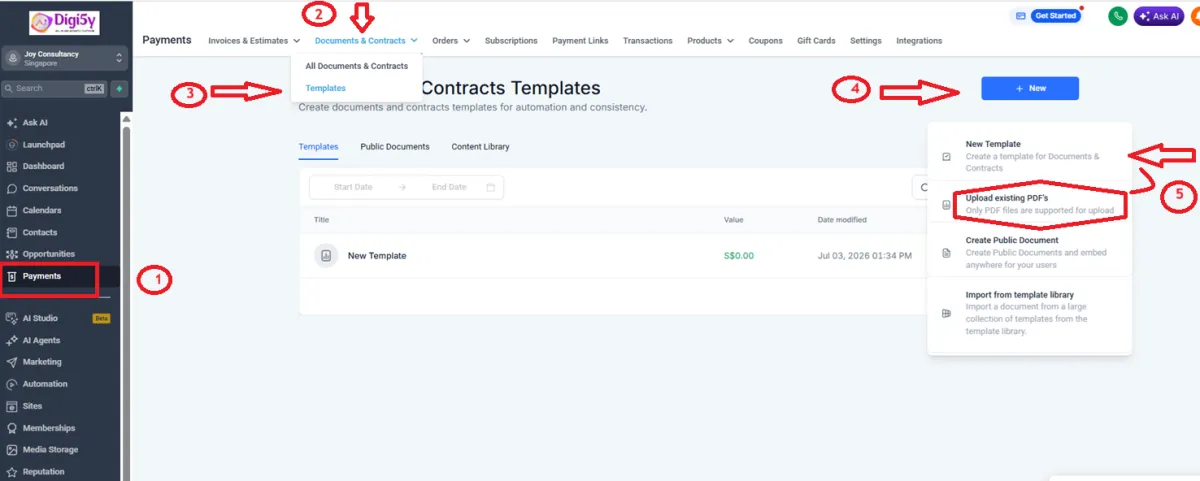
12. Create Proposal Templates
A standard proposal template saves time and keeps your business process consistent.
1. Go to “Payments” > “Documents & Contracts” > “Templates”
2. Click “New” to build a template or upload an existing PDF
3. Add fields for signature/data collection if using a PDF
4. Customize the layout and click “Save”
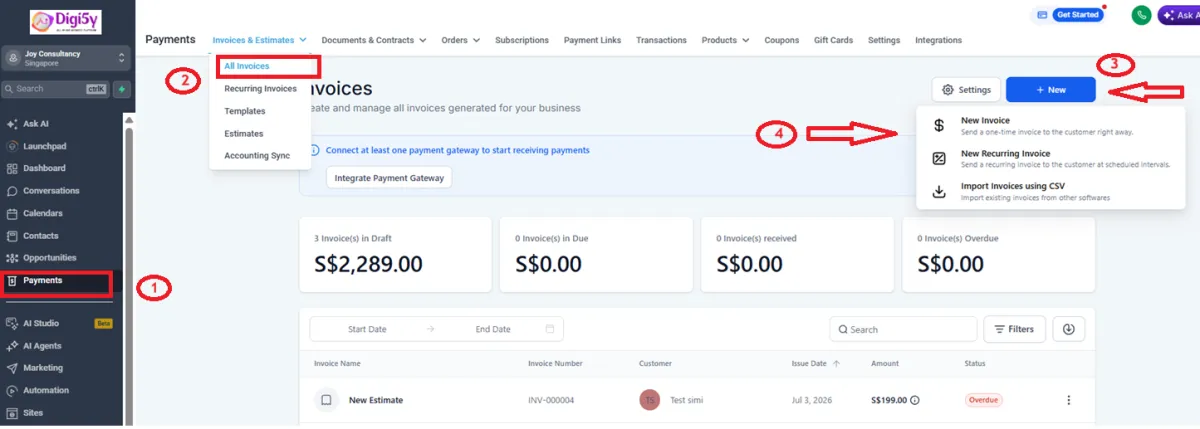
13. Create Invoice Templates
Templates make it faster to send invoices for standard jobs, either as a one-time or recurring template.
1. Go to “Payments” > “Invoices”
2. Choose “Recurring Templates” or “Templates” based on your need
3. Add the relevant products/items (created in Step 12)
4. Set frequency if recurring, then save
14. Setup Review Request Outreach (Email & SMS)
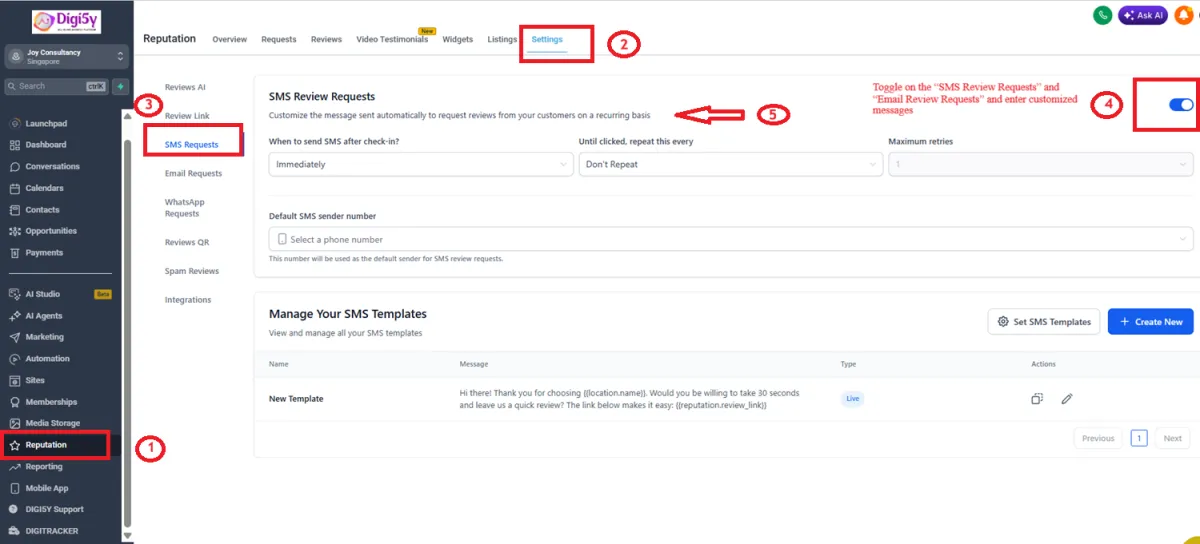
Composing Review Request Outreach Email and SMS templates enables users to quickly send review requests to contacts via the Bulk Action on desktop and the Quick Action in mobile. You can also use the “Send Review Request” Workflow action to automate review requests.
1. Go to “Settings” > “Reputation Management”
2. Setup Review Messages
3. Toggle on the “SMS Review Requests” and “Email Review Requests” and enter customized messages
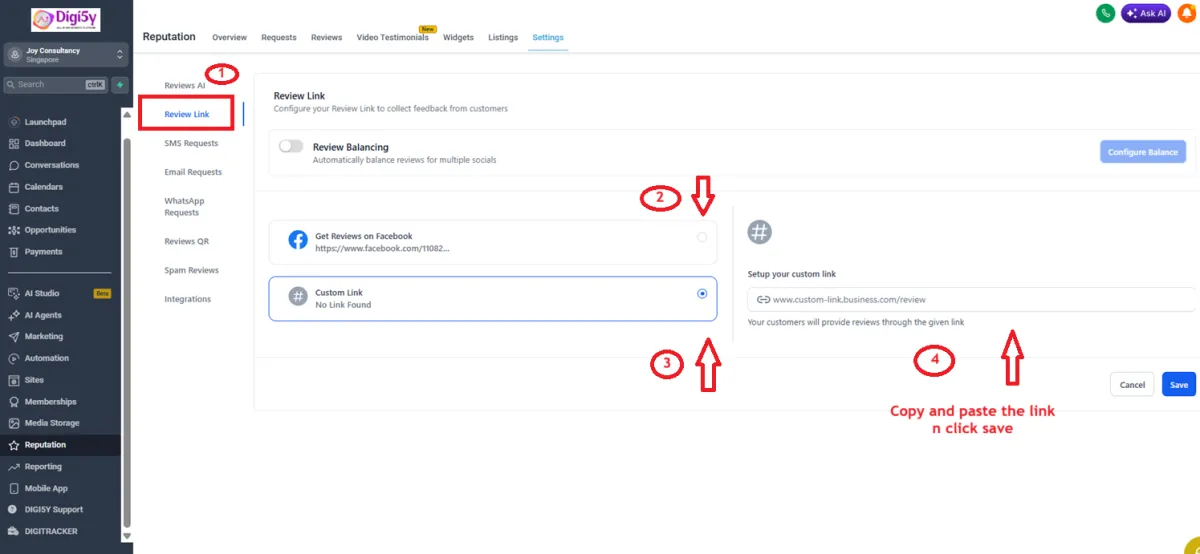
4. Under “Review Link”, select a connected platform (e.g. Google, Facebook)
Note: If Google isn’t linked, follow these steps to obtain the accurate link for submitting reviews on a specific Google Business Profile.
5. Click on “Custom Link” and enter a custom URL used for collecting review
6. ID Finder: https://developers.google.com/places/place-id
7. https://search.google.com/local/writereview?placeid=PASTEHERE (replace PASTEHERE with client’s ID).
8. Copy and paste link in the “Setup your custom link” field
9. Click the “Save” button
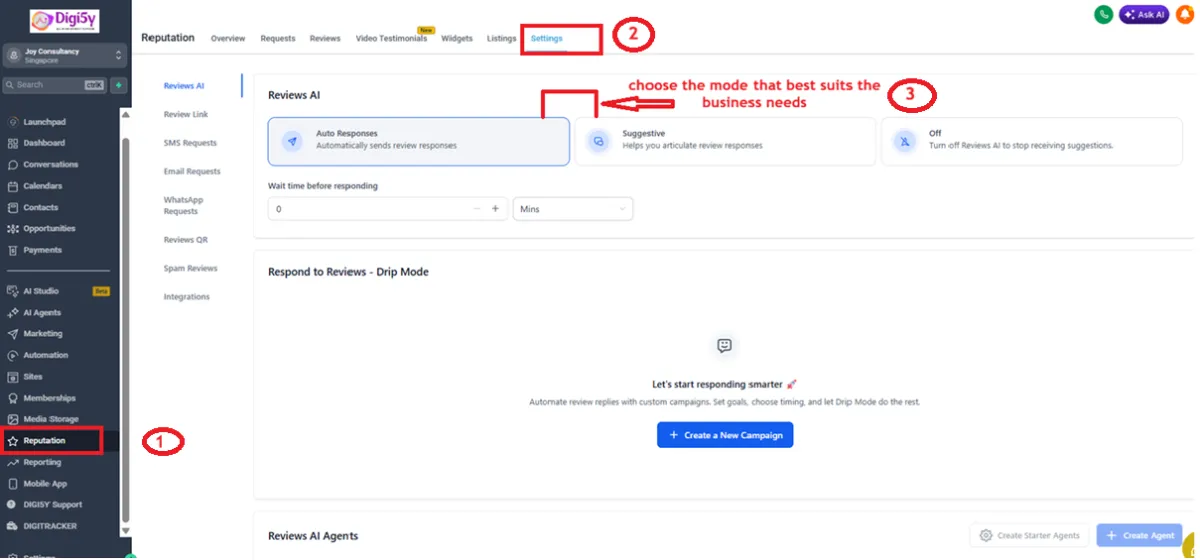
15.Activate Review Reply AI
Platforms like Google & Facebook reward businesses who reply to their reviews because it shows that the business is engaged with its customers. Activating Review Reply AI ensures that every review receives a reply.
1. Go to “Settings” > “Reputation Management”
2. There are two options at the top of the screen: "Suggestive" and "Auto Responses"
3. Choose the mode that best suits the business needs
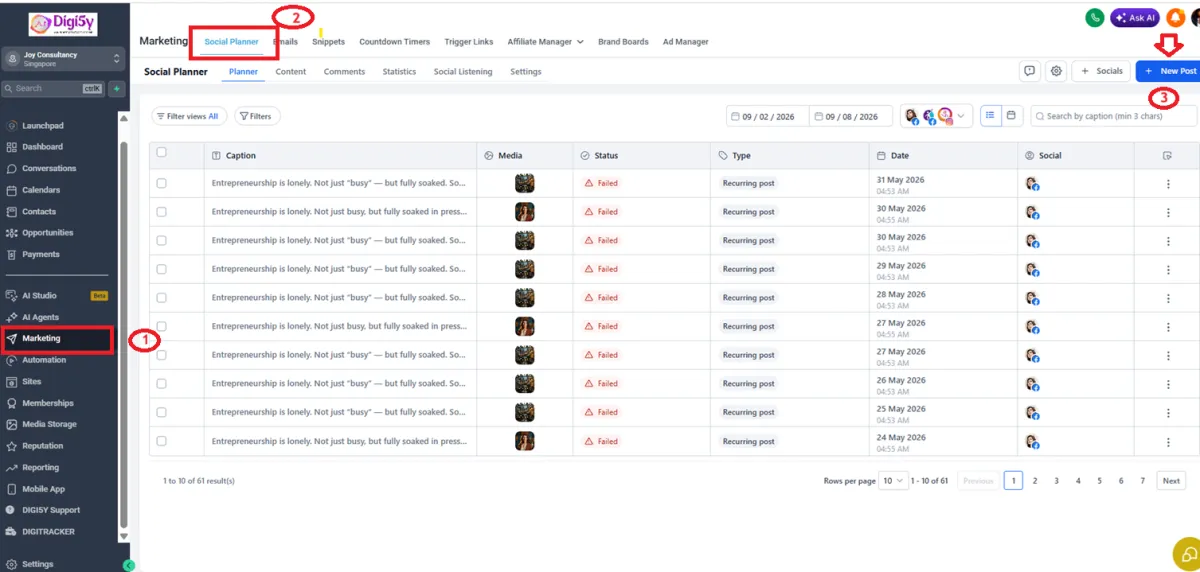
16. Activate Review Social Posting
Re-posting online reviews is another great way to increase reach and engagement on social platforms. And this can be done automatically by following these steps:
1. Go to “Marketing” > “Social Planner”
2. Click the "New Post" button and select "Post Reviews"
3. A modal will open on the screen where you can choose various options and schedule posts as desired
PART 4: QUICK WINS (GO-LIVE ESSENTIALS)
Fast, high-impact features to activate immediately so you start capturing leads right away.
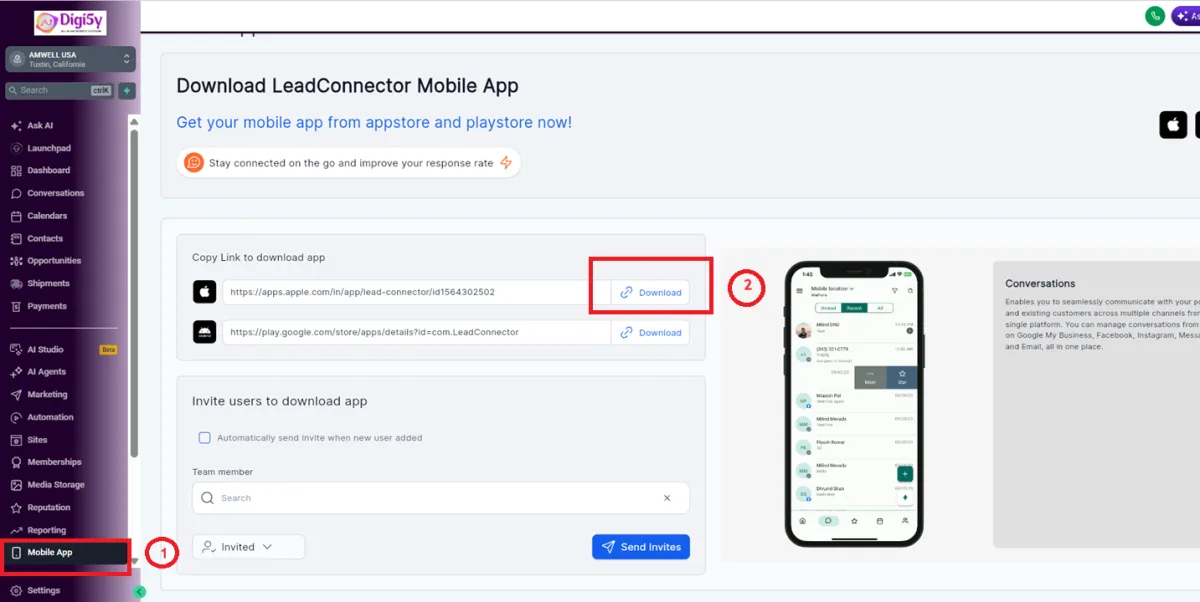
17. Download the Mobile App
Manage Contacts, Conversations, Appointments and Reviews on the go, and accept Tap-2-Pay payments from your phone.
1. Download the app from the Google Play Store or Apple App Store
2. Log in with your existing account credentials
3. Optional: white-label the mobile app under your own brand for an additional monthly fee
Note: you can also customize and white-label the mobile app for an additional $497/month. To begin customizing your own branded version of the mobile app, visit Agency Settings > Mobile App
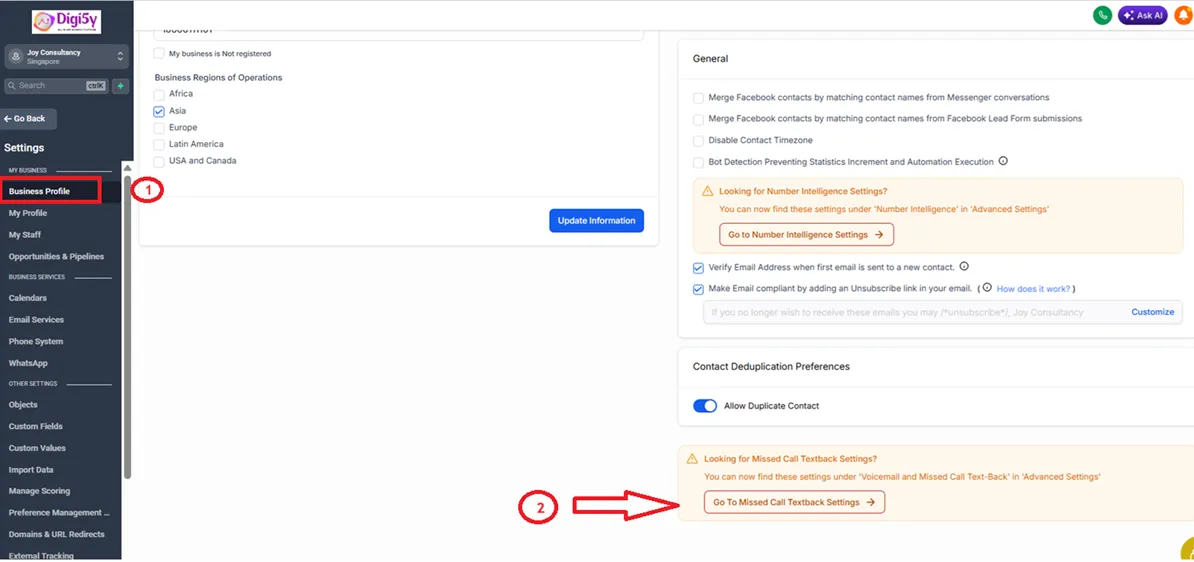
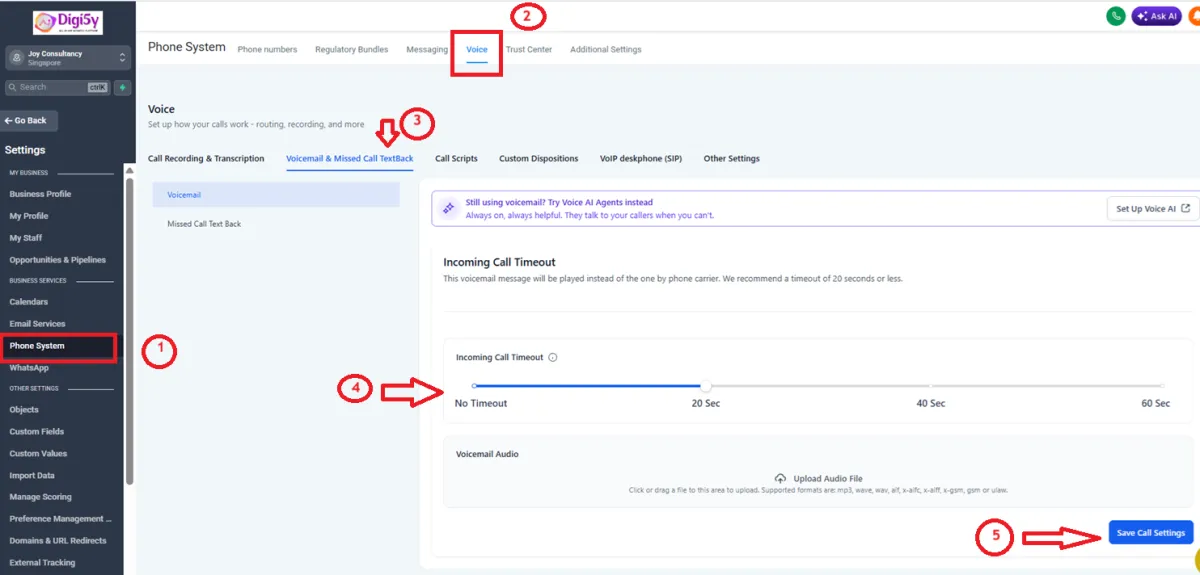
18. Enable Missed Call Text-Back
You can enable this setting in under 30 seconds and the system will immediately text people who call but don't get an answer saying: "Sorry we missed your call. How can we help?"
1. Go to "Settings" > "Business Profile"
2. Scroll to the bottom of the page on the right side and check the box in the "Missed Call Text Back" section
3. Enter the a message that's most appropriate for the business
Note: Be sure to test this feature by using the built-in testing field in the settings
19. Configure Live Web Chat Widget
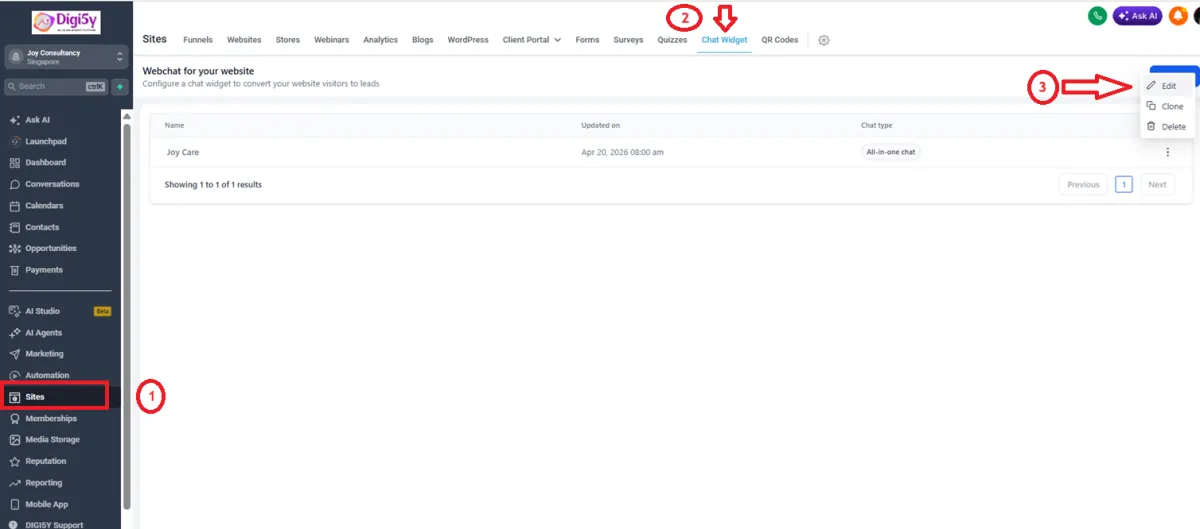
Integrating a chat widget on your website enables you to easily convert website visitors into leads. The HighLevel chat widget allows for two modes, or types: SMS and Live Chat.
We recommend using the "live chat" type if you are waiting for your A2P Registration to be approved as this type doesn't rely on a phone number but instead creates a conversation between the web chat widget on the contact's browser and the web or mobile app used by the company.
1. Go to “Sites” > “Chat Widget”
2. Update the "Chat bubble" settings as desired
3. Go to "Chat Type" and select "Live Chat"
4. Update the "Widget window" settings as desired
5. Update the "Acknowledgement settings" as desired
6. Click the "Save" button
20. Configure SMS Web Chat Widget
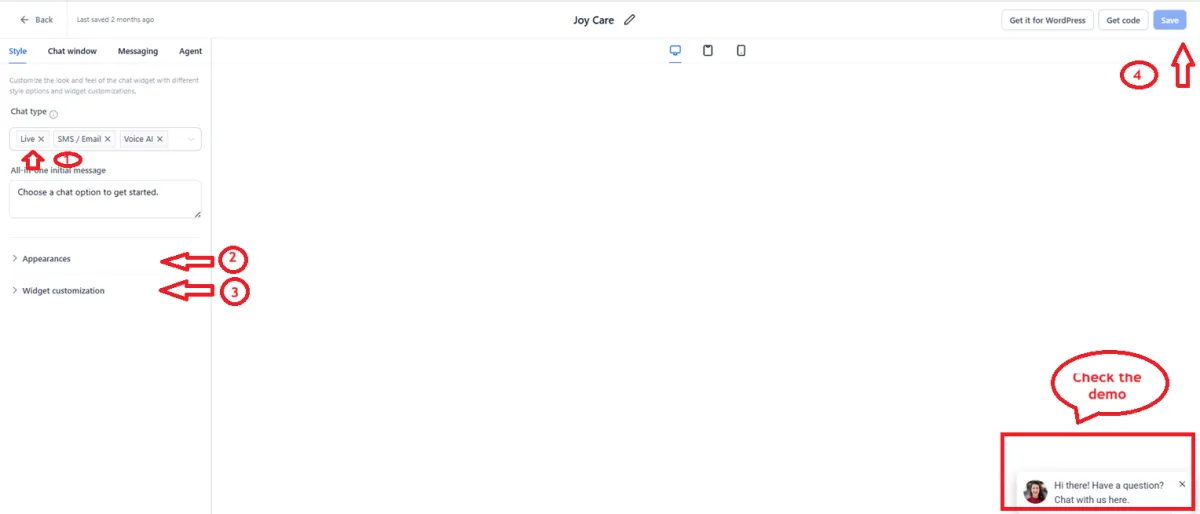
Once you've received your A2P registration, you can then switch the type to "SMS or Email Chat" which will allow for website visitors to initiate a text-message conversation via the webchat widget. Anyone who initiates a conversation via the widget is automatically added to Contacts.
1. Go to “Sites” > “Chat Widget”
2. Update the "Chat bubble" settings as desired
3. Go to "Chat Type" and select "SMS or Email Chat" [ REFER TO TOPIC 18 ]
4. Update the "Widget window" settings as desired
5. Update the "Acknowledgement settings" as desired
6. Click the "Save" button
21. Test Snippet Replies
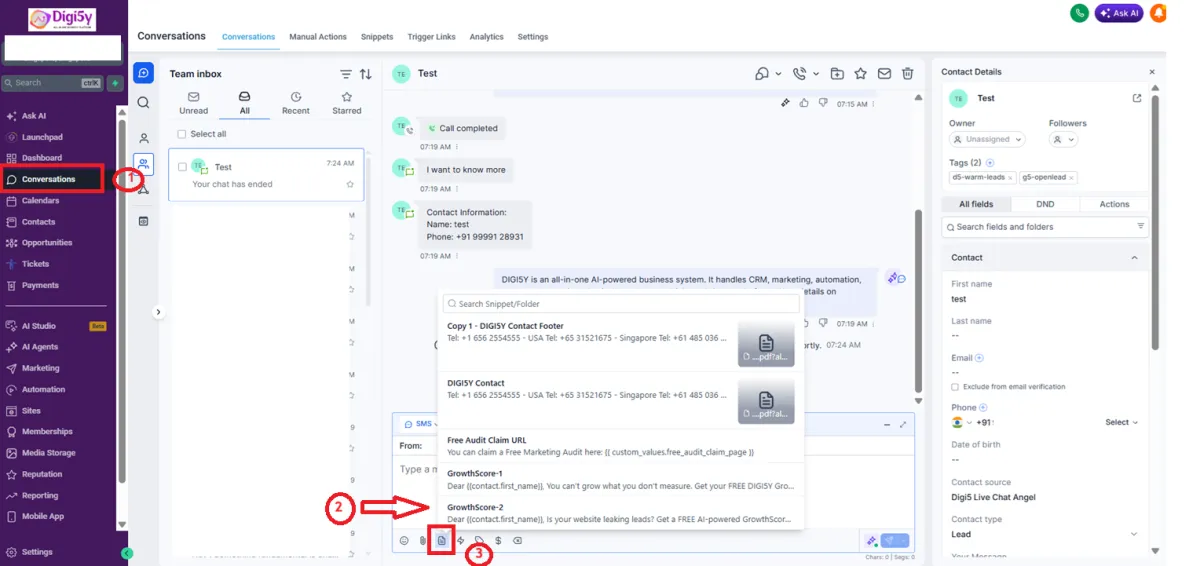
Confirm your saved message templates work correctly in real conversations.
1. Go to “Conversations”
2. In an SMS conversation, click the “Insert Template (Snippets)” icon
3. Select a snippet and click “Use Template”
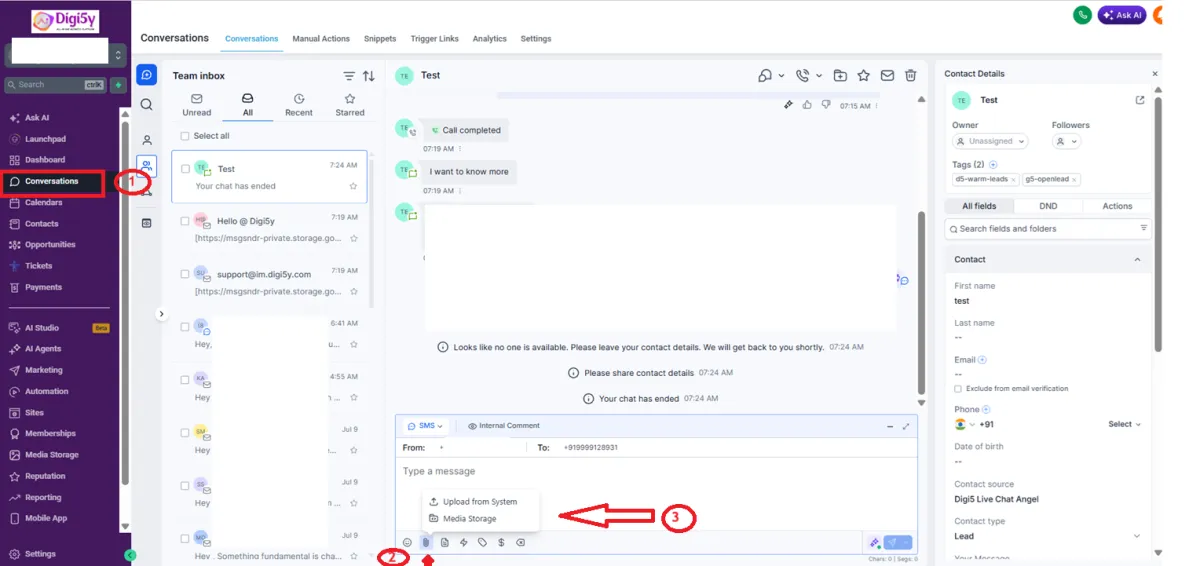
22. Test Video Replies
Send a personalized video message directly within a conversation.
1. Open a conversation (mobile or desktop)
2. Tap/click the attach icon and choose Video
3. Record or upload a video and send it
Note: There will be two options: "Upload from System" - upload from the computer's hard drive; "Choose from Media Library" - add video from the built-in Media Library in HighLevel.
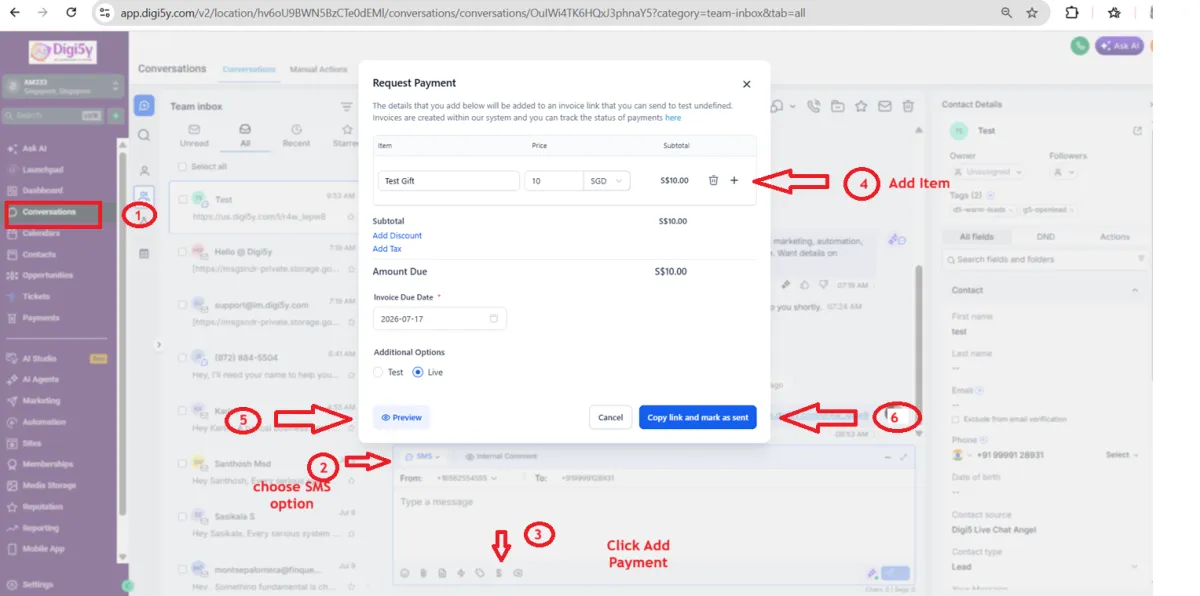
23. Test Text-2-Pay
Confirm customers can pay via a link sent directly in a text message.
1. Open a conversation and tap “Request Payment”
2. Add the item and price, preview the invoice
3. Generate and send the payment link
PART 5: MARKETING & GROWTH (LEVEL UP)
Advanced tools to actively generate, nurture, and close leads through ads and automation.
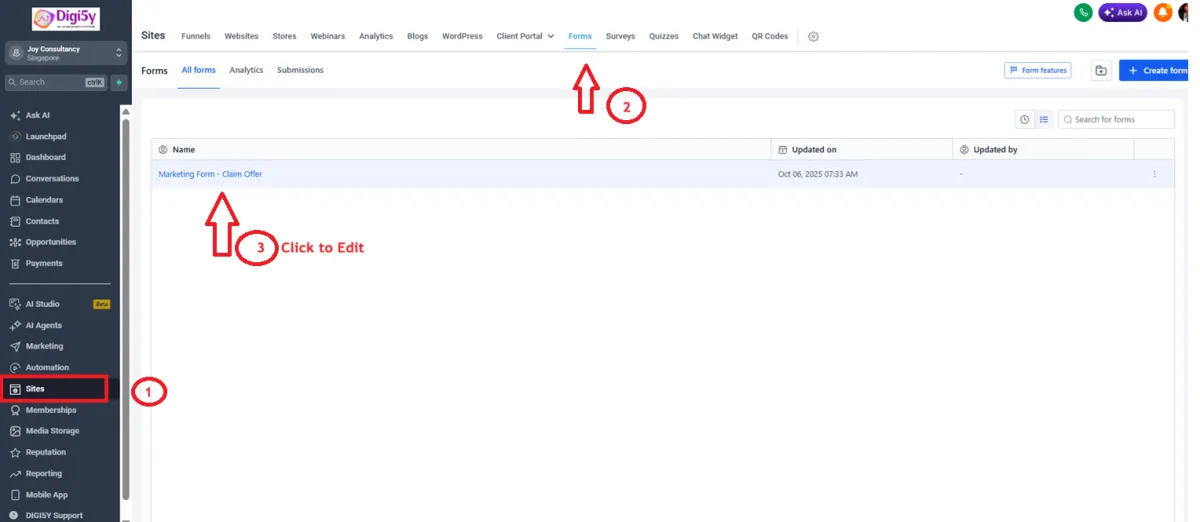
24. Review the Offer Form
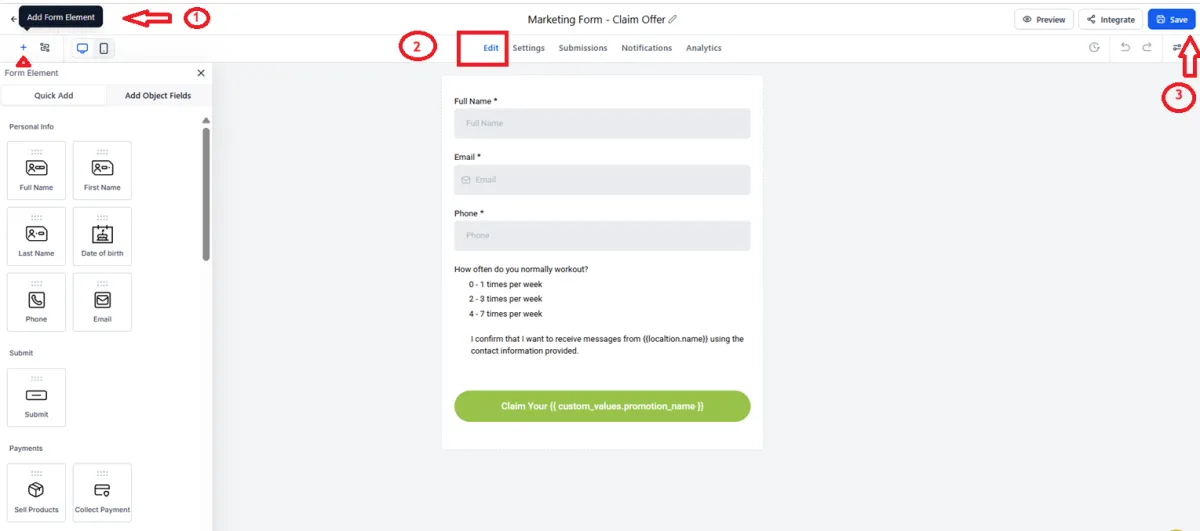
This form captures new leads from your ad campaigns — review and edit it before going live.
1. Go to “Sites” > “Forms” > “Form Builder”
2. Open the “Claim Offer” form and edit fields as needed
3. Click “Save”
Note: When saving a form, a new version is created. Previous versions of the form can be viewed and restored by clicking the "Versions" icon below the "Save" button.
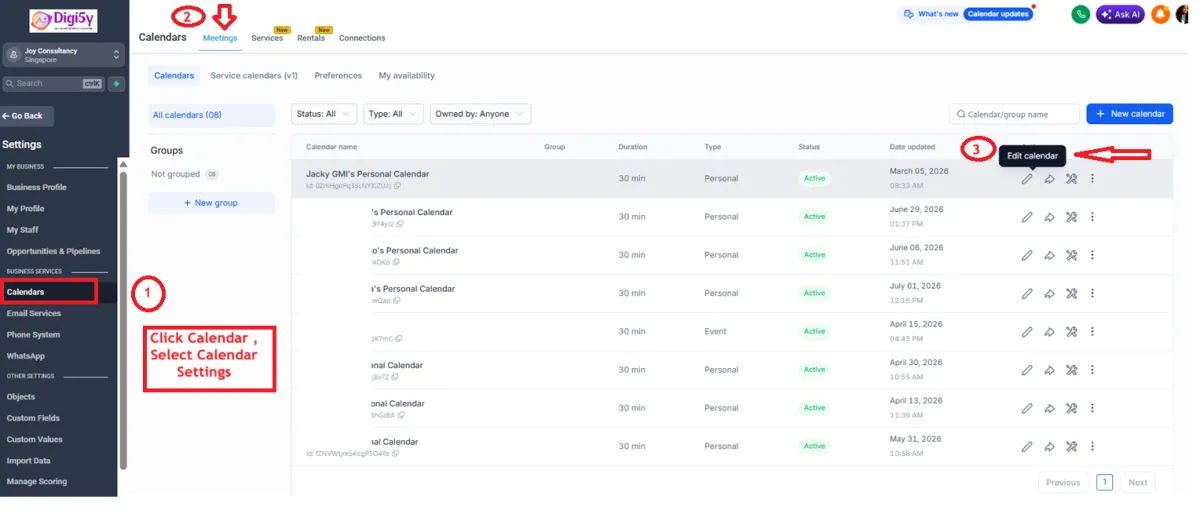
25. Calendar Configuration & Integration
Review the booking calendars included in your setup and optionally sync with Google/Outlook/iCal.
1. Go to “Calendars” > “Calendar Settings”
2. Click the three dots > “Edit” on each calendar to review details
3. Optional: connect an external calendar for two-way sync
26. Configure the Sales Funnel
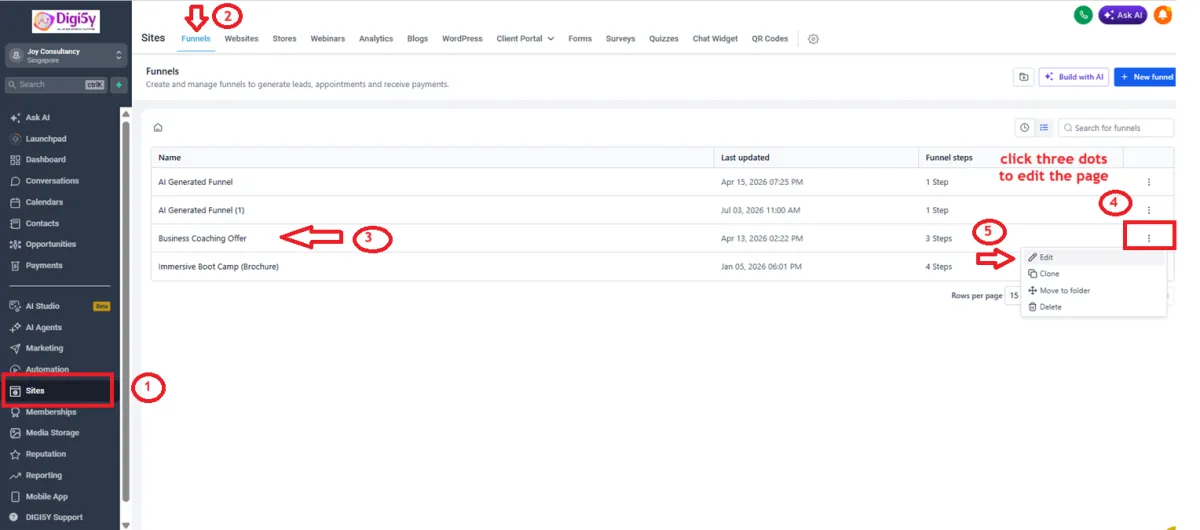
The funnel takes a lead from ad click, to offer claim, to appointment booking, automatically.
1. Go to “Sites” > “Funnels”
2. Click “Edit” on each step/page to update content
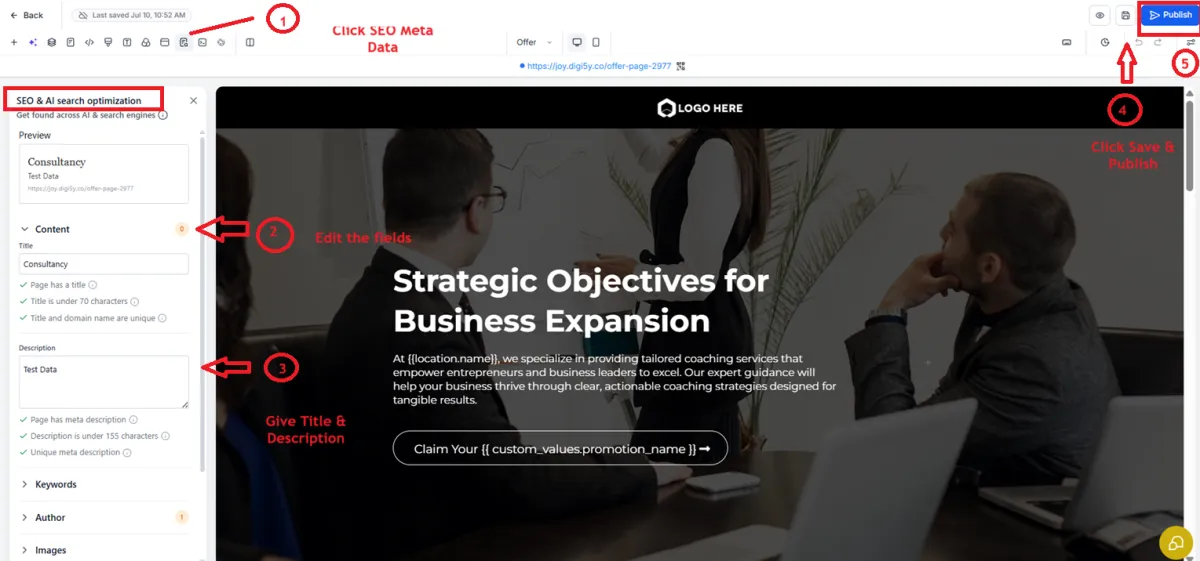
3. Update the SEO Meta Data for each page
4. Click “Save”, then “Publish” when ready
27. Configure Your Website
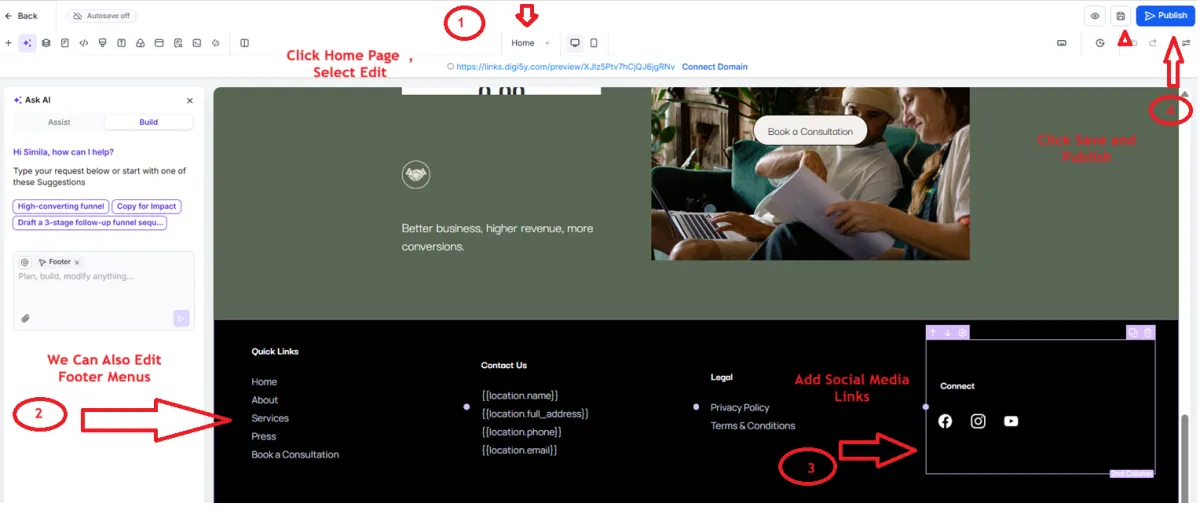
Customize the included website template with your services, FAQs, and links.
1. Go to “Sites” > “Websites”
2. Edit the Services and FAQ sections on the Home page
3. Review and update all navigation and social media links
4. Enable the Chat Widget and update SEO Meta Data
5. Click “Save” on each page
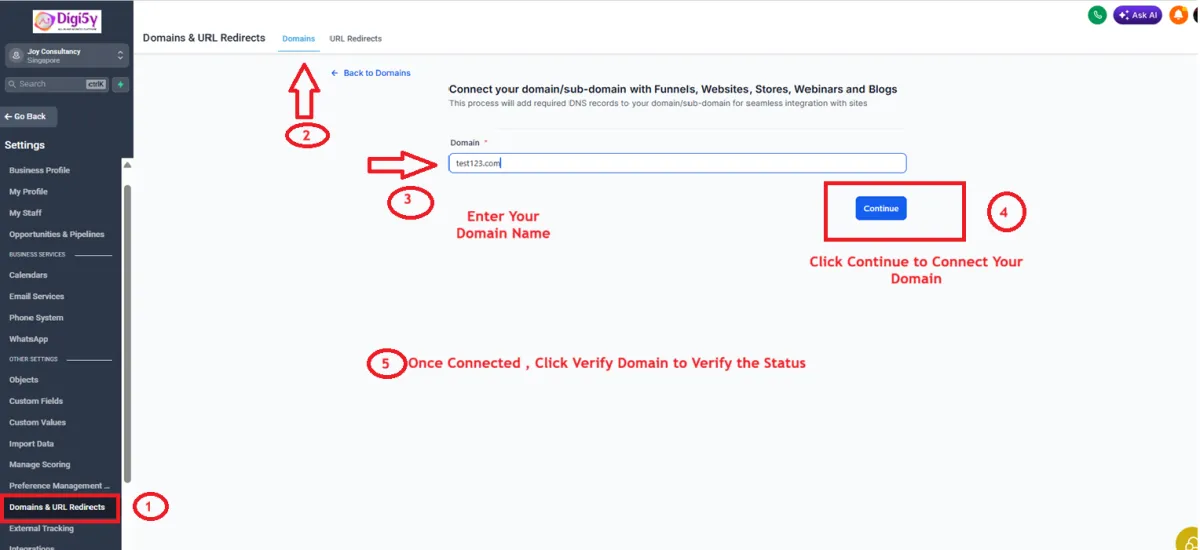
28. Activate Your Domain
Point your own domain to your new website or funnel so it goes live for visitors.
1. Go to “Settings” > “Domains”
2. Enter your domain name and click “Add & Verify”
3. Connect DNS records as prompted
4. Click “Verify Domain”, then select the homepage for this domain
29. Update Custom Values for Website Pages
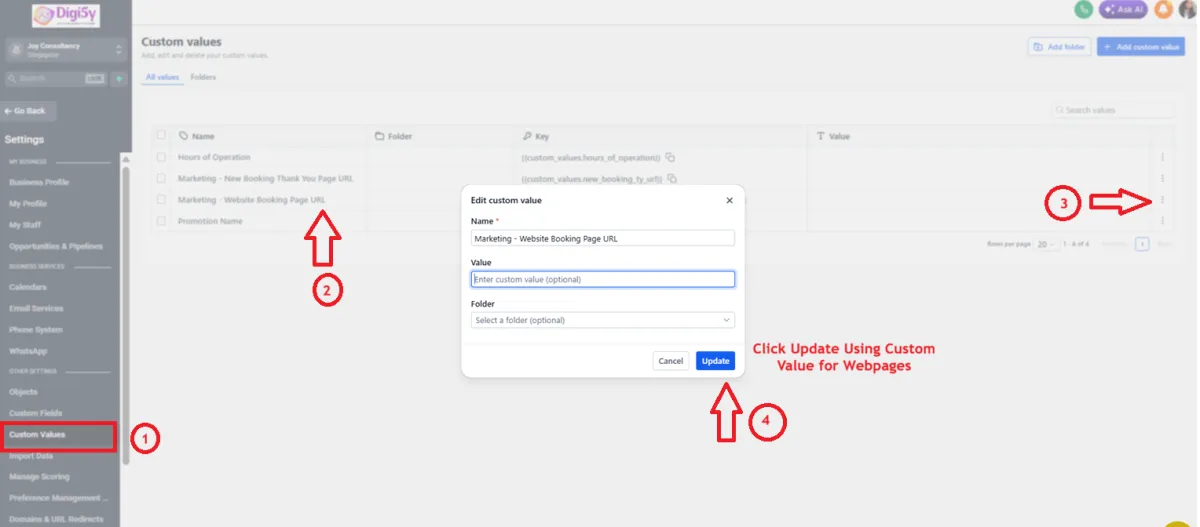
Once your domain is live, update the page-URL custom values used in your emails and workflows.
1. Go to “Settings” > “Custom Values”
2. Edit “Promotion Name” and the website booking/thank-you page URLs
30. Review the Sales Pipeline
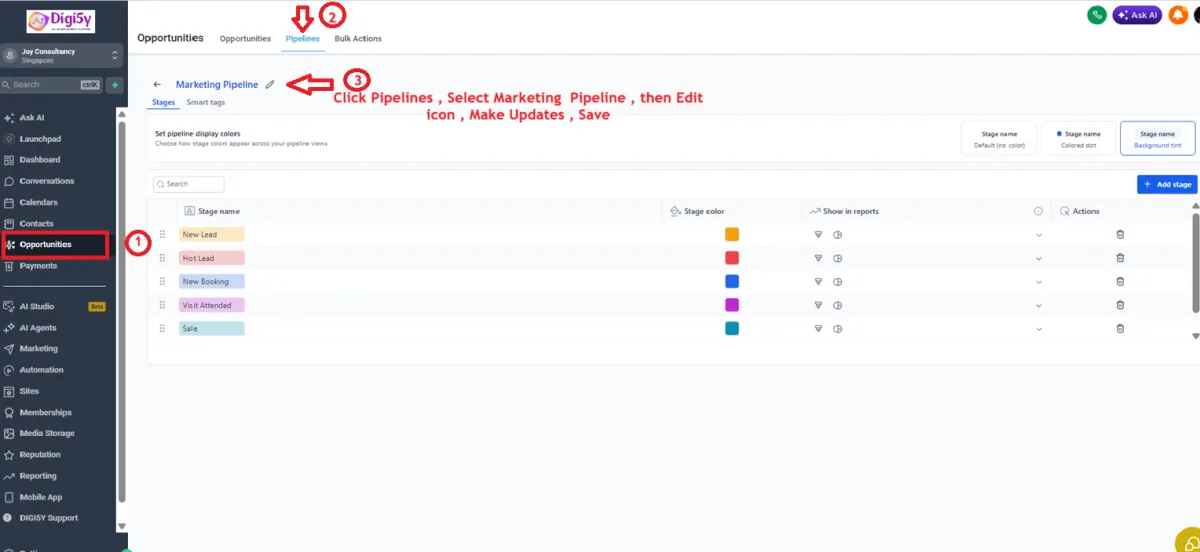
Track new leads as they move through your sales process, from first contact to close.
1. Go to “Opportunities” > “Pipelines”
2. Open the Marketing Pipeline and click the pencil icon to edit stages
3. Click “Save”
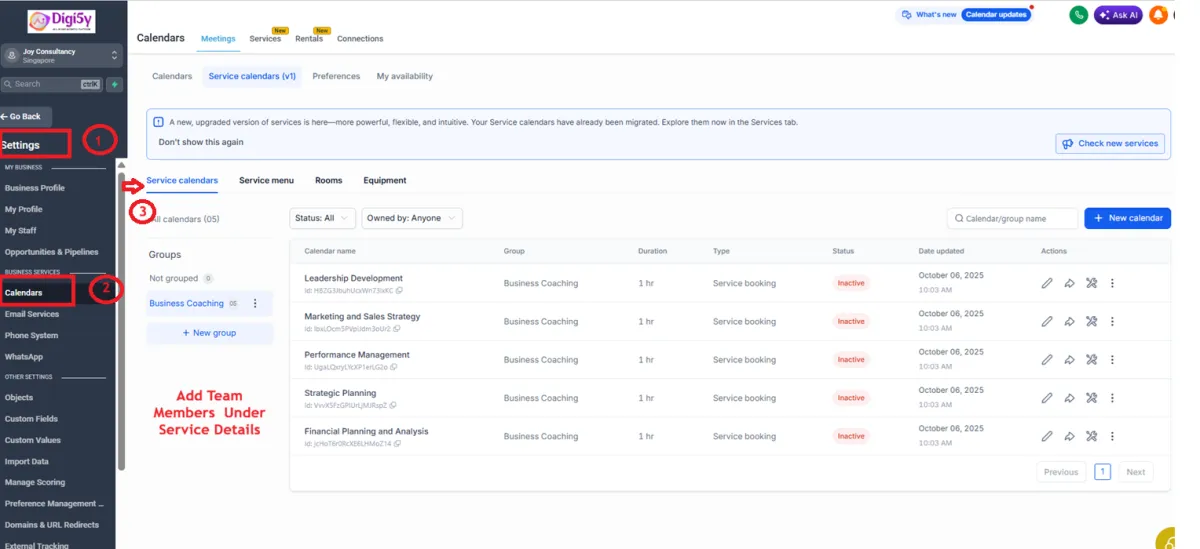
31. Review Service Calendars
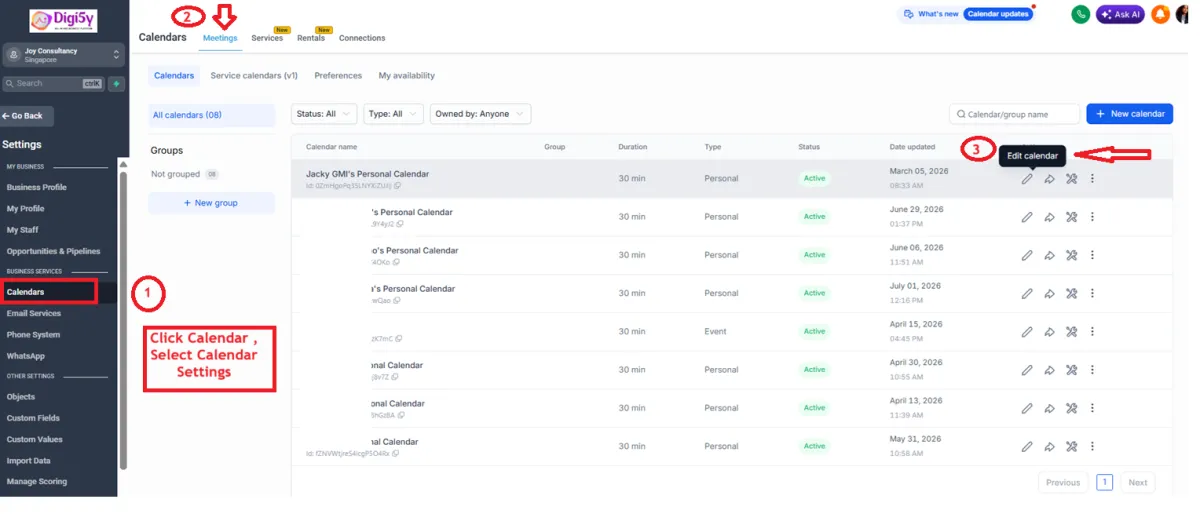
Assign staff and equipment to each specific service offered.
1. Go to “Settings” > “Calendars”
2. Edit each Service Calendar to match your actual services
3. Add team members under Service Details
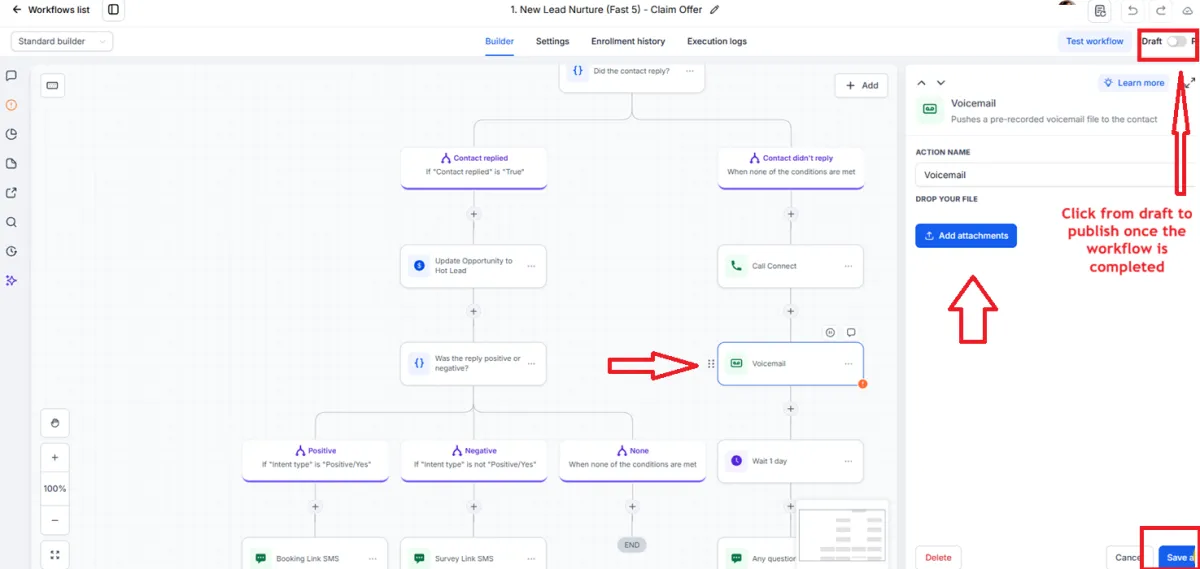
32. Review and Activate Workflows
Workflows run your automation in the background — nurturing leads with emails, SMS, and reminders automatically.
1. Go to “Automation” > “Workflows” > “Marketing Workflows” folder
2. Open “New Lead Nurture (Fast 5) – Claim Offer” and update each Email/SMS action
3. Open “Long Term Nurture” and update each action
4. Toggle each workflow from “Draft” to “Publish” and click “Save”
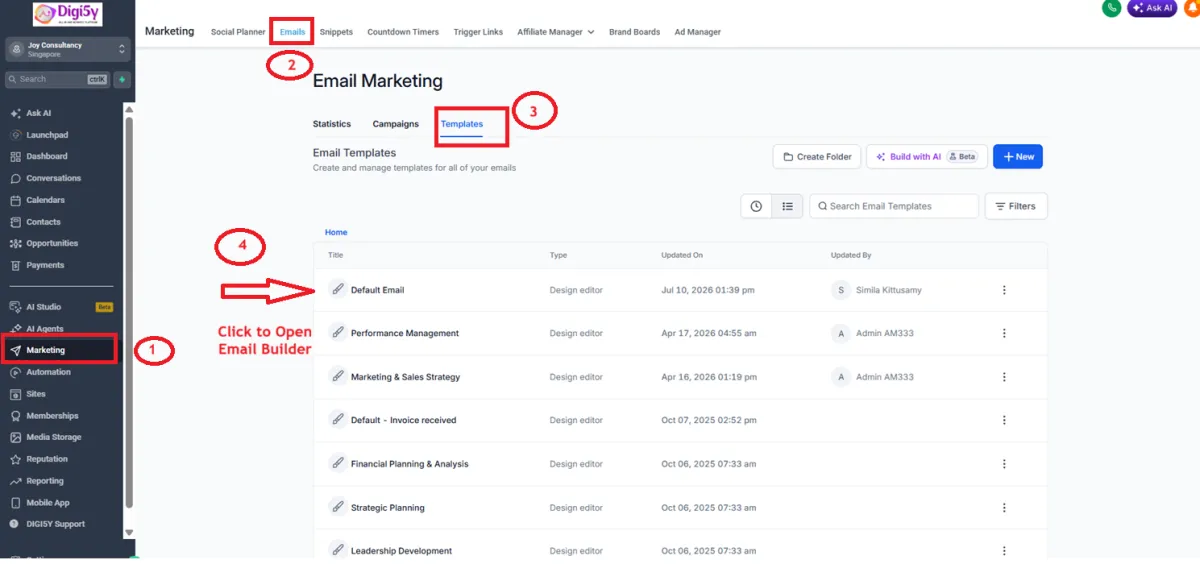
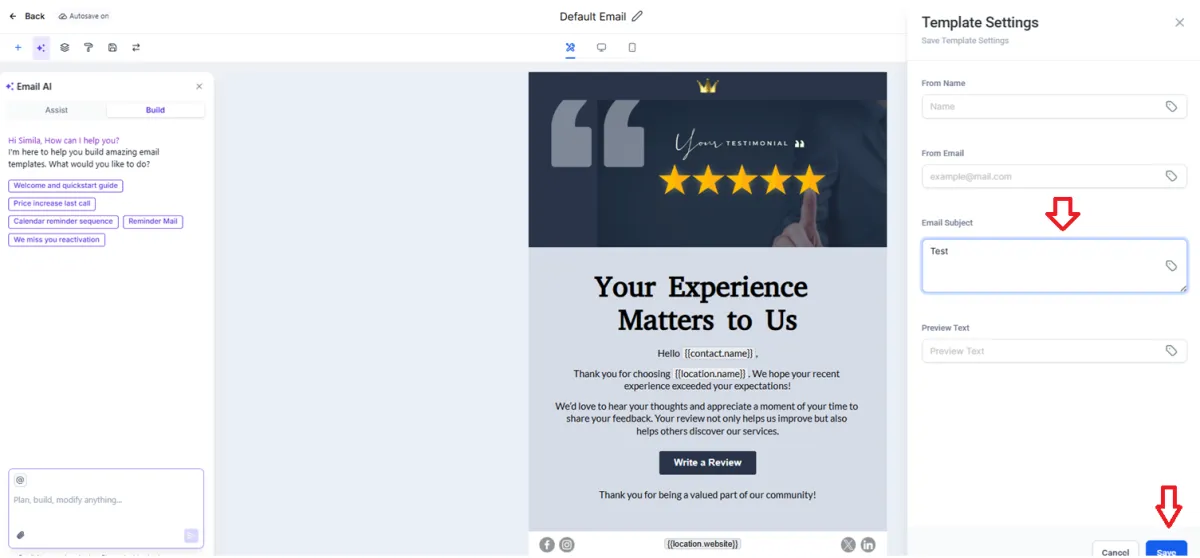
33. Review Email Templates
Fine-tune the pre-built email templates to match your specific services.
1. Go to “Marketing” > “Emails” > “Templates”
2. Rename titles and edit content as needed
3. Update the Subject line under Settings
4. Click “Save”
34. Bulk SMS - Database Reactivation
Send a bulk SMS campaign to your existing customer list to generate repeat business and referrals.
1. Prepare your existing contact list
2. Use the Bulk SMS / Database Reactivation guide to plan messaging
3. Send and track responses
35. Add a Link-in-Bio Page to Socials
A simple landing page with your key links, ideal for Instagram/Facebook bios.
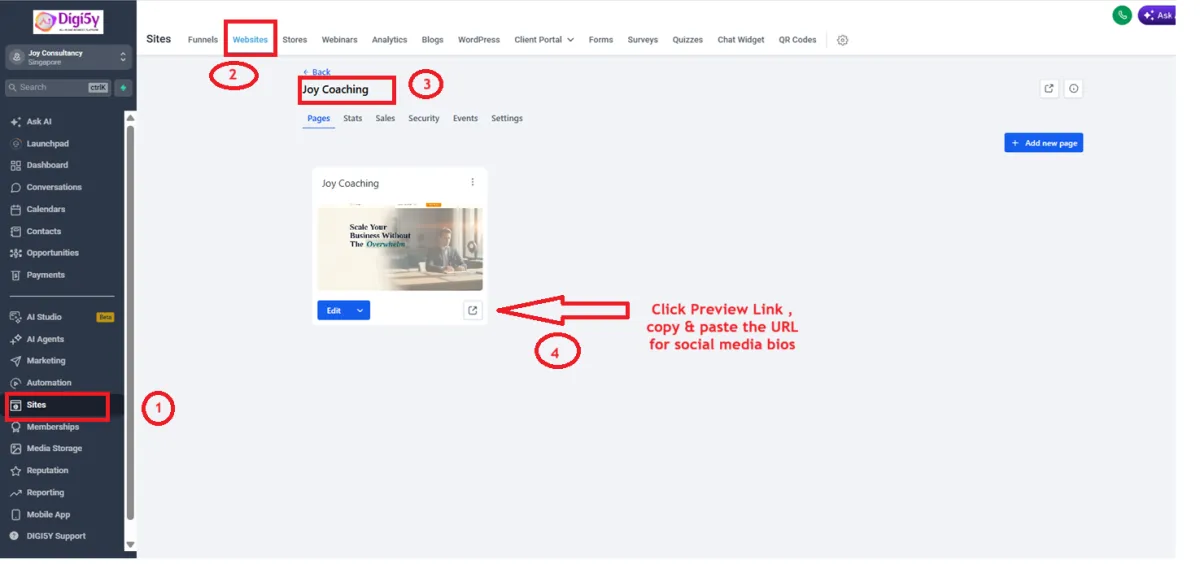
1. Go to “Sites” > “Websites”
2. Open the “Link in Bio” page and click “Preview Link”
3. Copy the URL and add it to your social media bios
36. Add a Brand Board
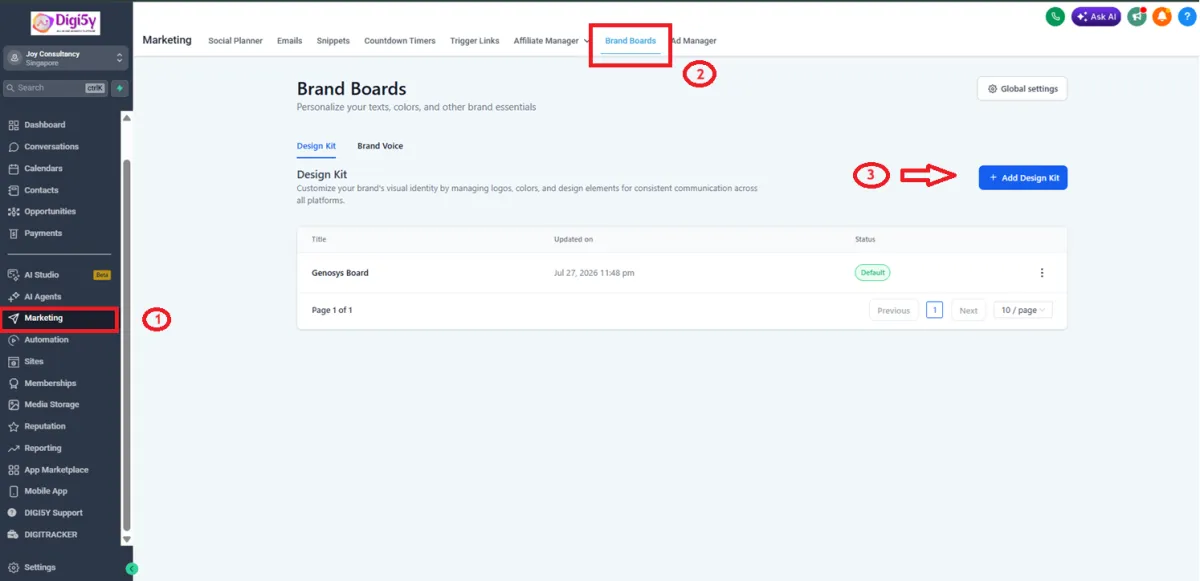
Step 1: Navigate to Brand Boards
Step 2: Create a New Brand Board
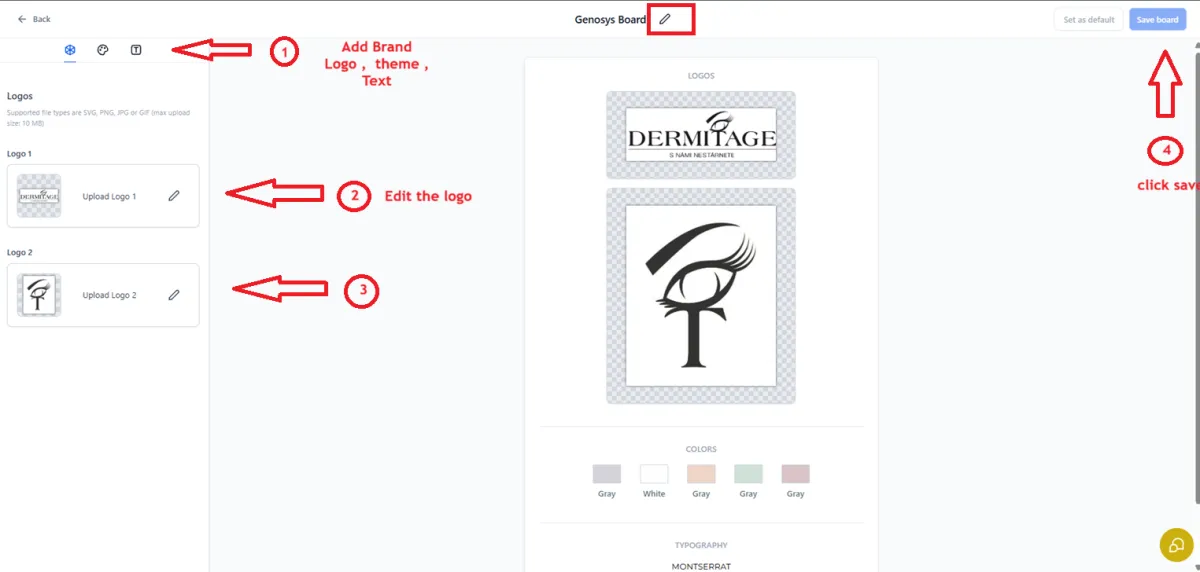
Step 3: Upload Your Logo
Step 4: Add Brand Colors
Step 5: Add Brand Fonts
Step 6: Set as Default
Step 7: Use in Builders
Step 8: Edit or Delete (if needed)
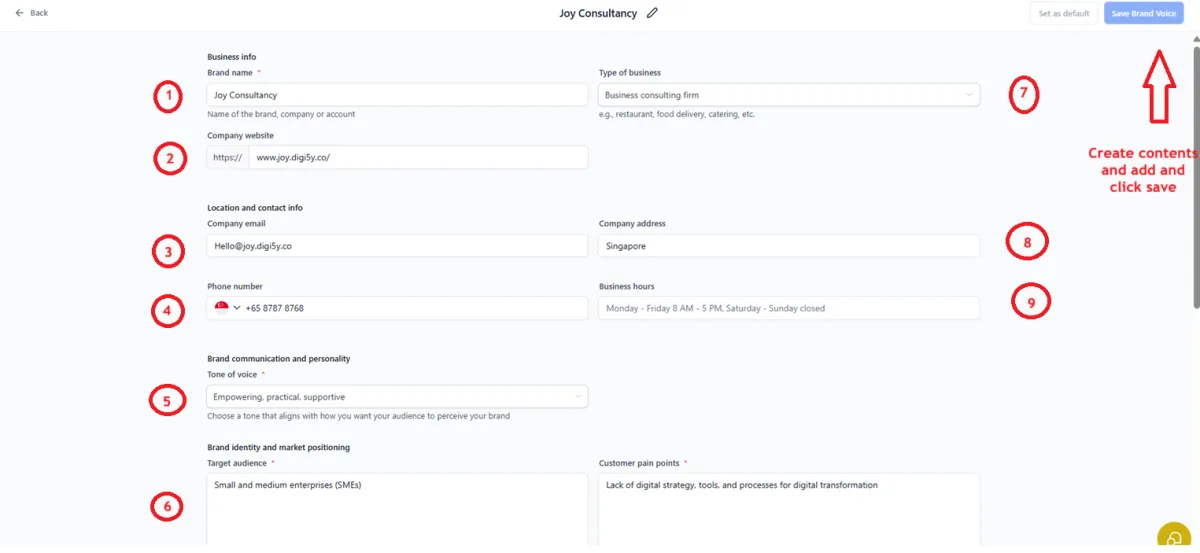
37. SETTING UP YOUR BRAND VOICE
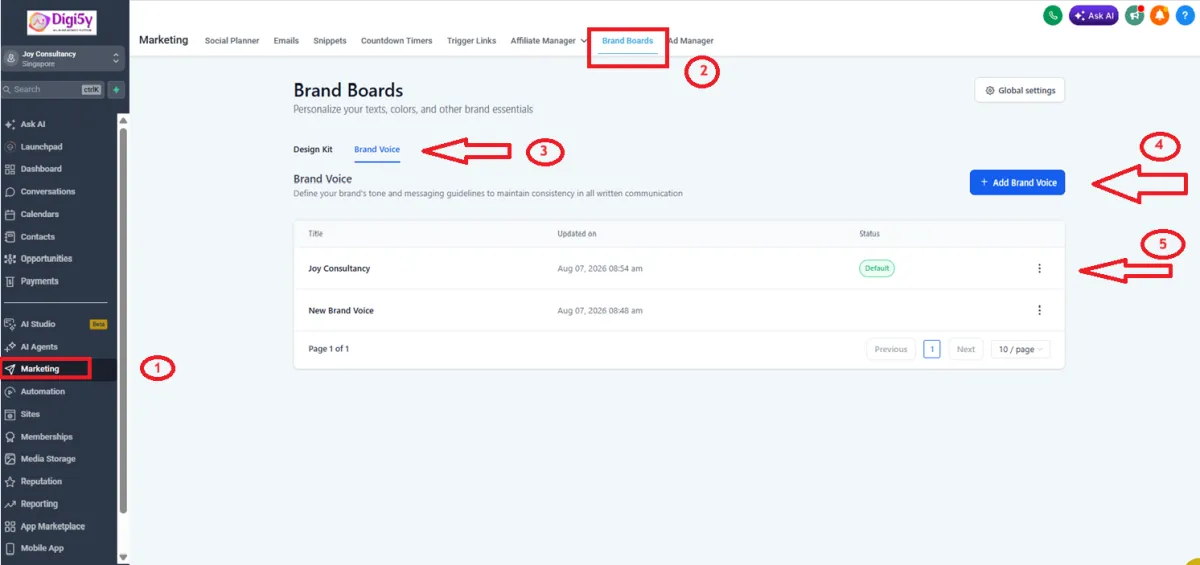
Step 1: Access Brand Voice
Step 2: Create a New Brand Voice Profile
Step 3: Add Reference Content
Step 4: Save the Profile
Step 5: Apply Brand Voice When Generating Content
Step 6: Edit or Manage Existing Profiles
Step 7: Use in Builders
Step 8: Edit or Delete (if needed)
Best Practices
Be specific in your tone description - "friendly, concise, and actionable" works better than just "friendly"
Use real examples from your best-performing content so the AI has a clear model
Start with one main Brand Voice and refine it over time, rather than creating many at once
Always review AI-generated output and adjust the profile if the tone feels off
🎉 Setup Complete!
Congratulations! Your Digi5y account setup is now complete.
Your account is now configured and ready to help streamline your sales, marketing, customer management, and business operations with Digi5y.
Thank you for choosing Digi5y.
Need Assistance?
For technical support or setup-related assistance, please contact us:

DIGI5Y is an AI-Powered All-in-one Business System, customized to provide the sales, marketing and business development activity and automation with remote specialist support at your disposal, suitable for no-tech, low-tech, and high-tech businesses.


COMPANY
INFORMATION
© Copyright Digi5y.com 2026. All rights reserved.