
WEBSITE SUPPORT GUIDE
Everything you need to know about DIGI5Y set up to grow faster, smarter, and without the chaos.

As an account user. Once you had logged in and verified your account. You will receive Digi5y online tutorial invitation.
It is highly recommended that you take some time to watch and review the admin tutorials before setup.
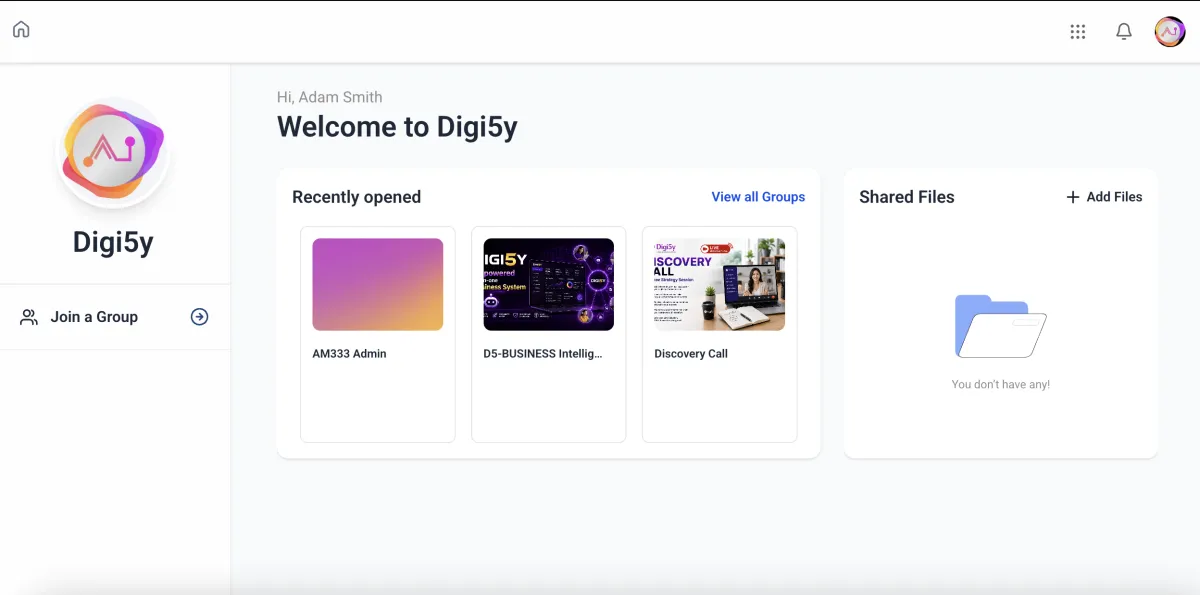
Log in to the DIGI5Y Community to access your admin tutorials.

Haven't Set Up Your Account Yet? Start Here

Discover Where You're Losing Leads - For Free
Support Guide: How to Set Up Domains, Website, and Funnels
1. Domain & Sub-Domain Setup
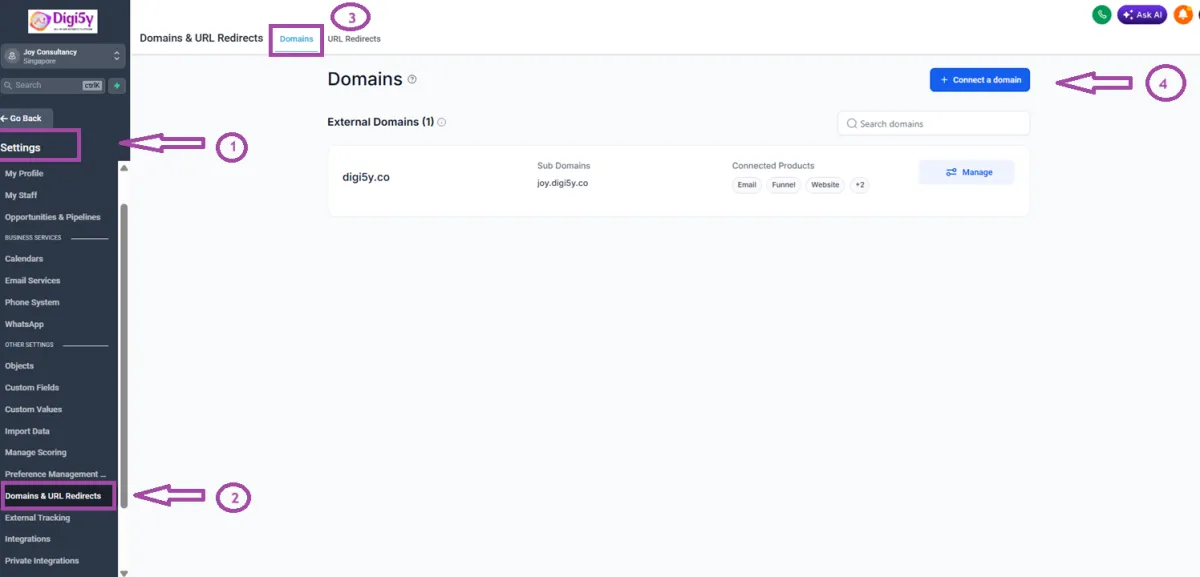
Connecting your domain ensures your branded presence is consistent across websites, funnels, emails, and client-facing tools. Go to Settings → Domains & URL Redirects → Domains tab.
How to Connect a Domain (Automatic Method)
① Go to Settings in the left sidebar.
② Click the "Domains" tab at the top.
③ Select "Domains & URL Redirects" from the sidebar menu.
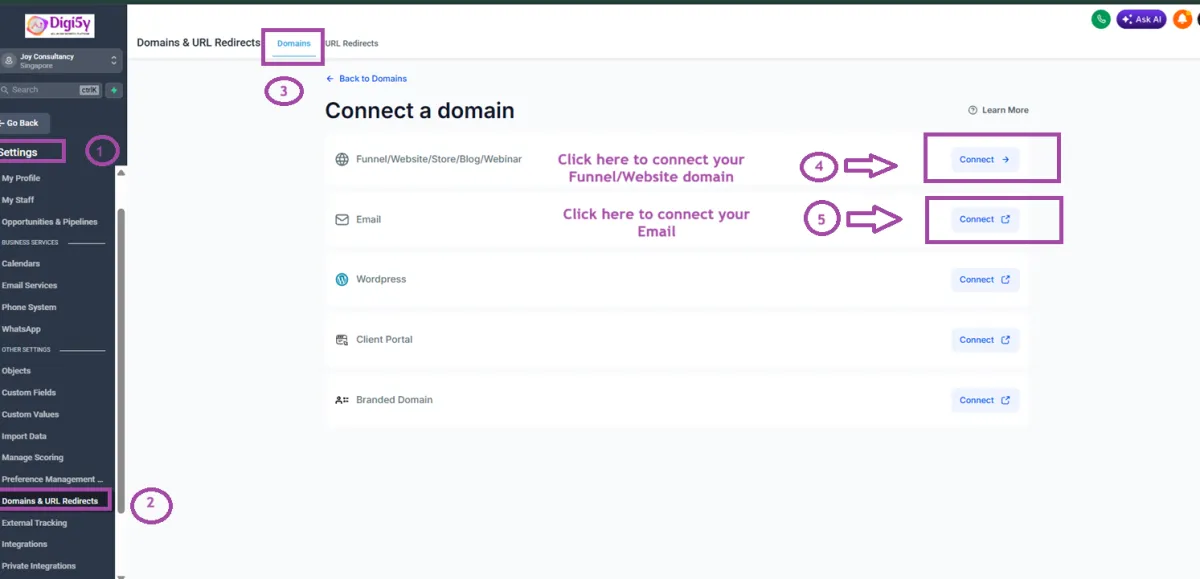
④ Click "Connect a Domain," then choose the product (Funnel/Website/Store/Blog/Webinar, Email, etc.)
⑤ Click "Authorize" to let DIGI5Y auto-configure your DNS records
Step 1: Open Domains - Go to Settings → Domains & URL Redirects → Domains tab, then click "Connect a Domain".
Step 2: Choose the Product - Select what you're connecting the domain to: Funnel/Website/Store/Blog/Webinar, Email, WordPress, Client Portal, or Branded Domain.
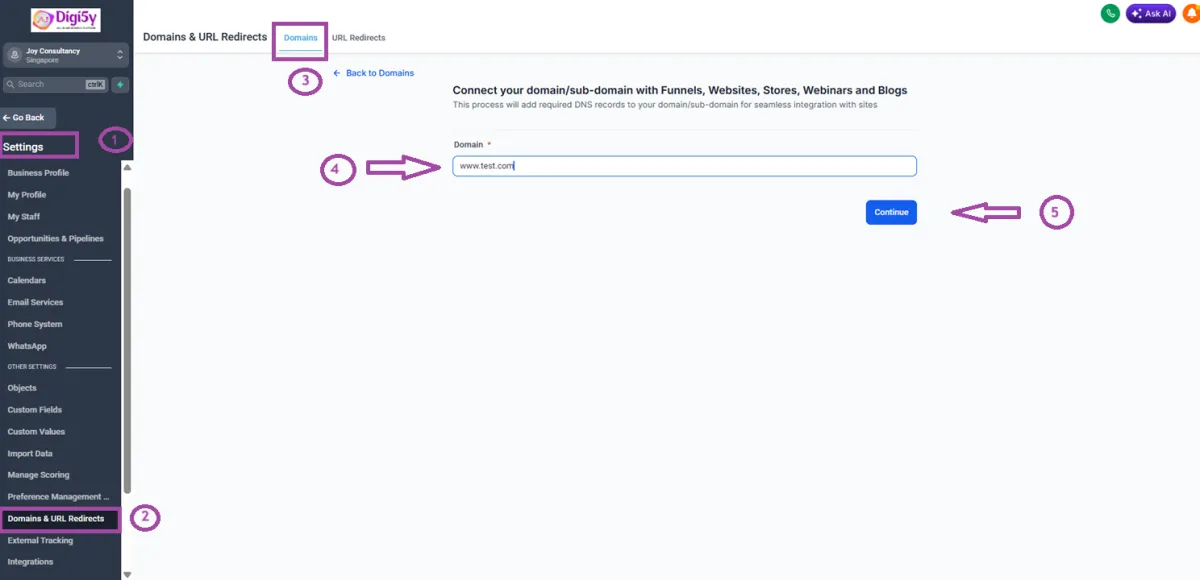
Step 3: Enter Your Domain - Type in your root domain or sub-domain. If you also want the "www" version, you'll see an option to add the root domain as well.
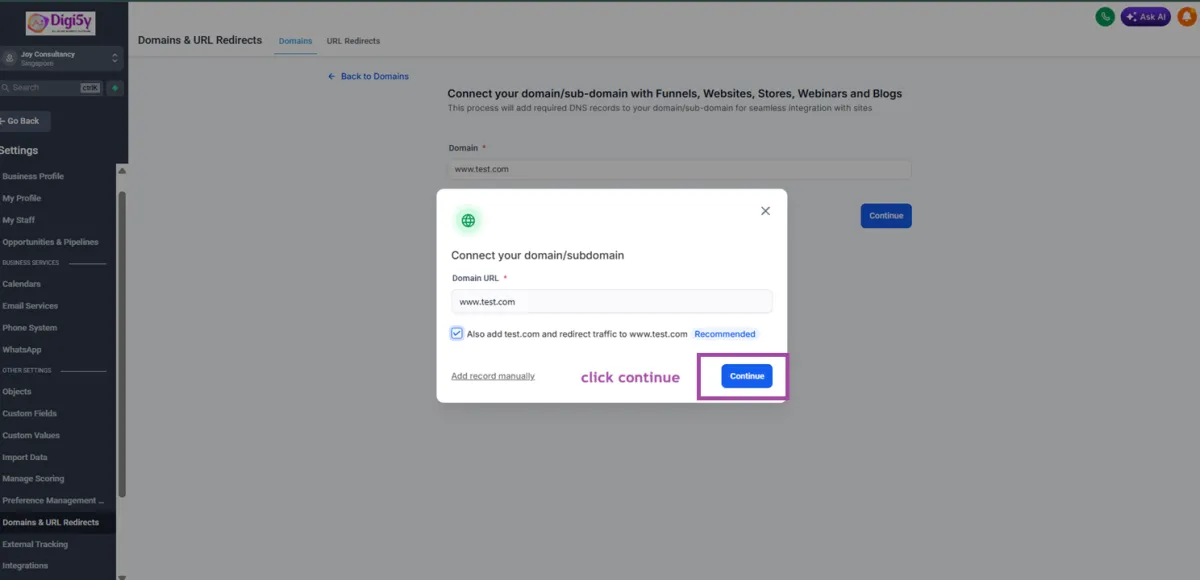
Step 4: Verify - Return to DIGI5Y and click "Verify Records". This can take a few minutes up to 24 hours to fully activate.
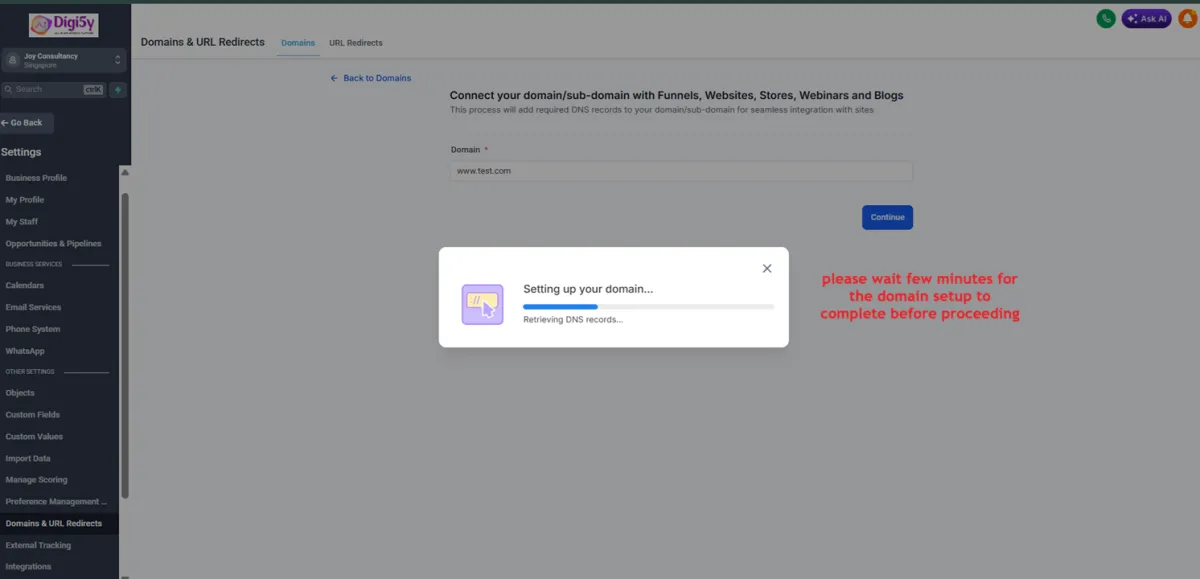
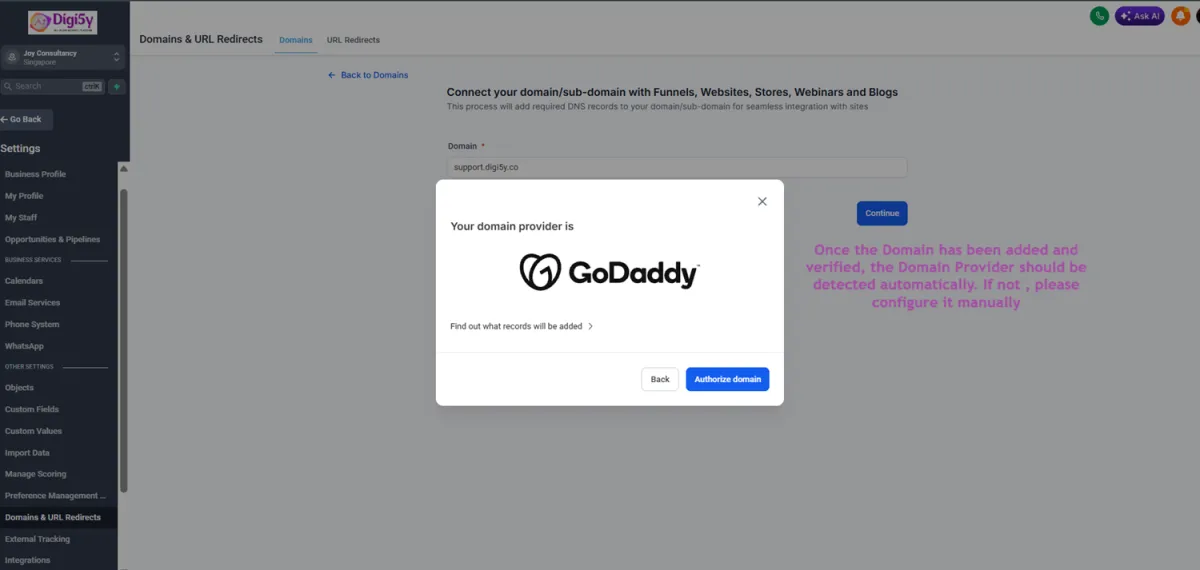
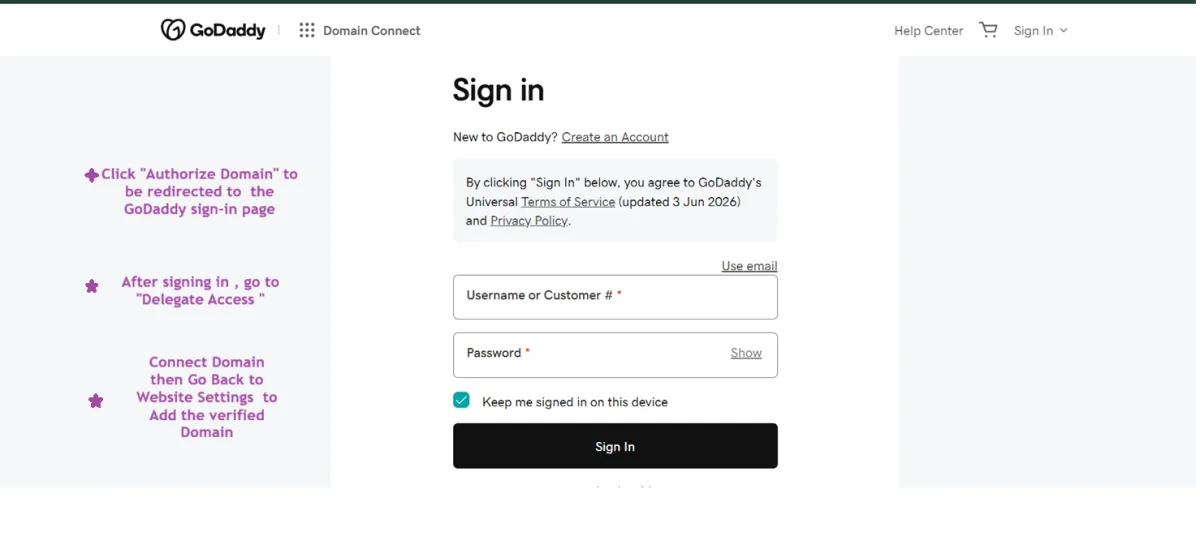
Step 5: Authorize - If your provider is supported, click "Authorize" to let Domain Connect access your DNS settings, then follow the on-screen prompts on your provider's site.
Confirm : Once authorization is complete, close that tab and return to DIGI5Y your DNS records are added automatically.
How to Connect a Domain (Manual Method)
① Enter your domain name in the Connect a Domain screen.
② Click "Add records manually."
③ Copy the A, CNAME, or TXT records shown.
④ Paste these records into your domain provider's DNS settings.
⑤ Save changes and wait up to 24 hours for the domain to verify.
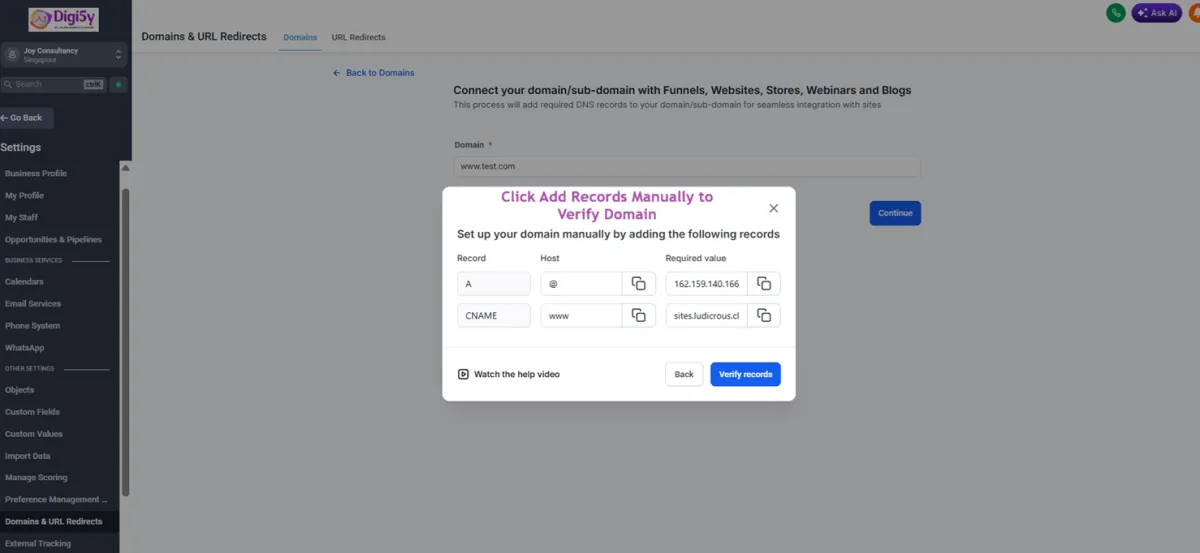
Note: If a domain shows "Pending" for more than 24 hours, double-check your DNS values or contact DIGI5Y Support.
2. Website Creation (Header, Footer, Saved Sections, Templates, AI)
DIGI5Y's Website Builder uses a drag-and-drop editor with multi-page navigation, global headers/footers, and AI-generated design. Go to Sites → Websites.
How to Create a New Website
① Go to Sites → Websites in the left sidebar.
② Click "New Website."
③ Choose Blank Page, Template, or AI-Generated Website.
④ Add your pages (Home, About, Pricing, etc.)
⑤ Click Publish once your site is ready.
Step 1: Choose a Starting Point - Click "New Website", then choose a blank page, a ready-made template, or AI-Generated Website (DIGI5Y builds a complete site from your business details or a reference link/image).
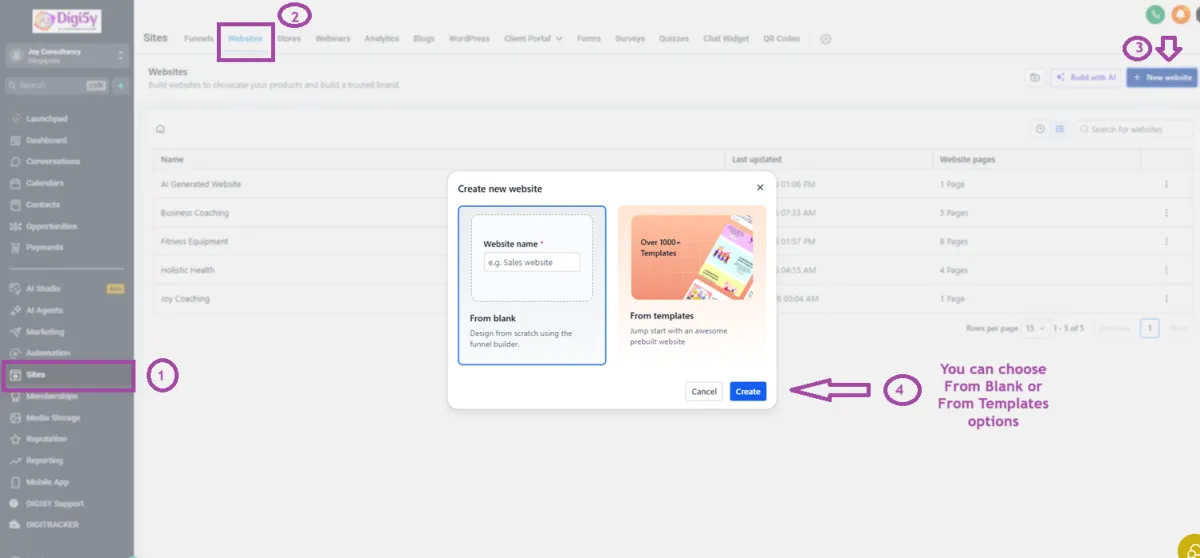
Step 2: Add Pages - Create individual pages (Home, About, Pricing, etc.) - each gets its own path/URL under your connected domain.
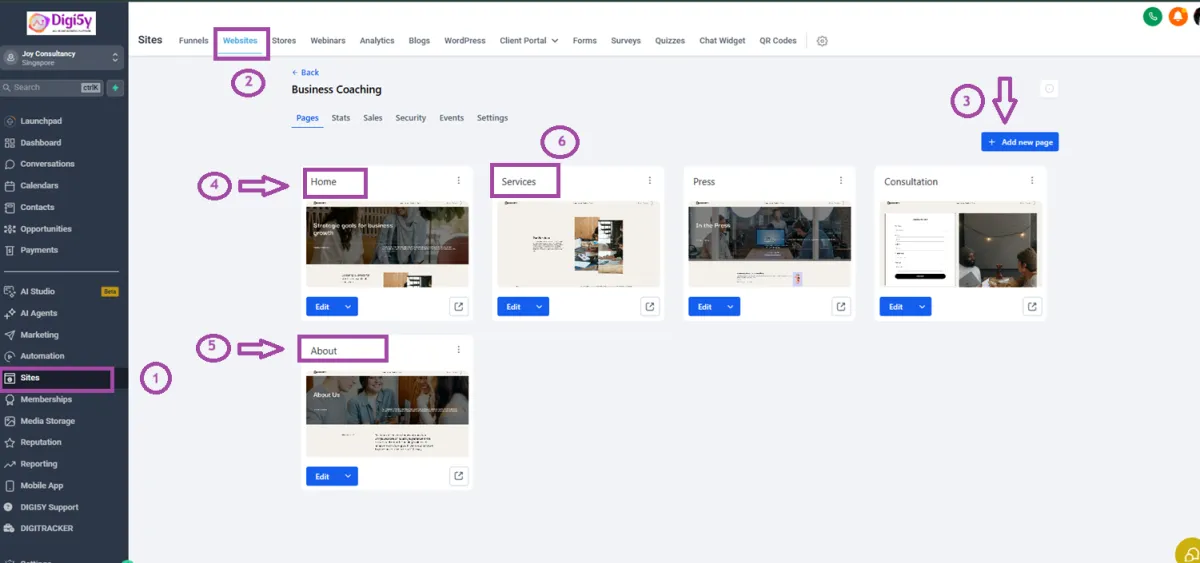
Step 3: Edit Content - Drag in text, images, forms, videos, and buttons using the builder; use "Ask AI" to update copy or styling with a simple prompt.
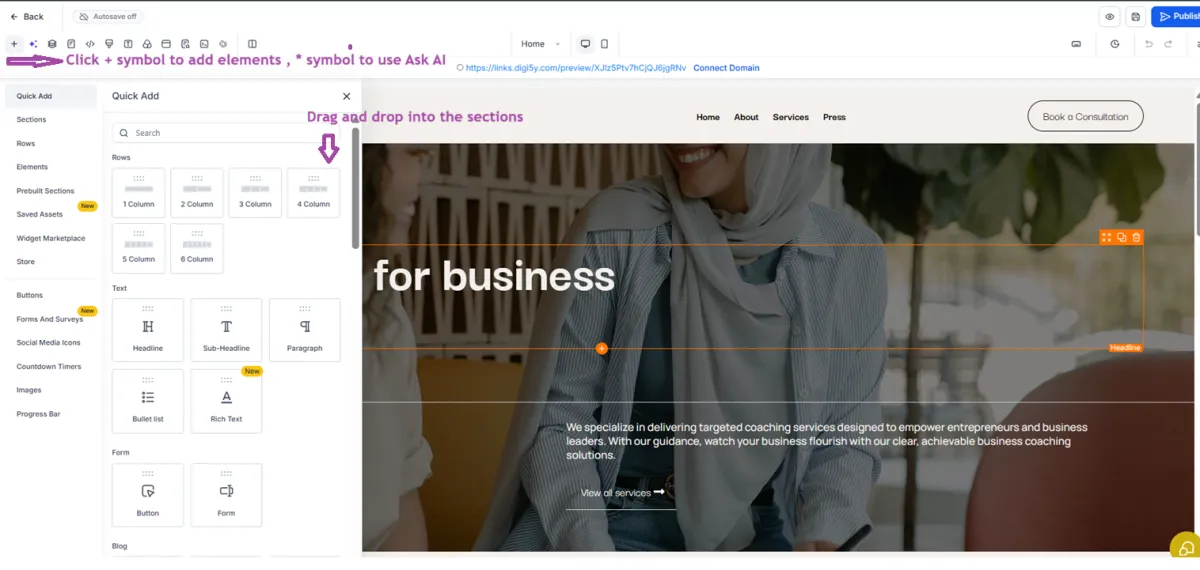
Step 4: Connect Your Domain - Under the site's Publishing settings, connect your domain (see Section 1)
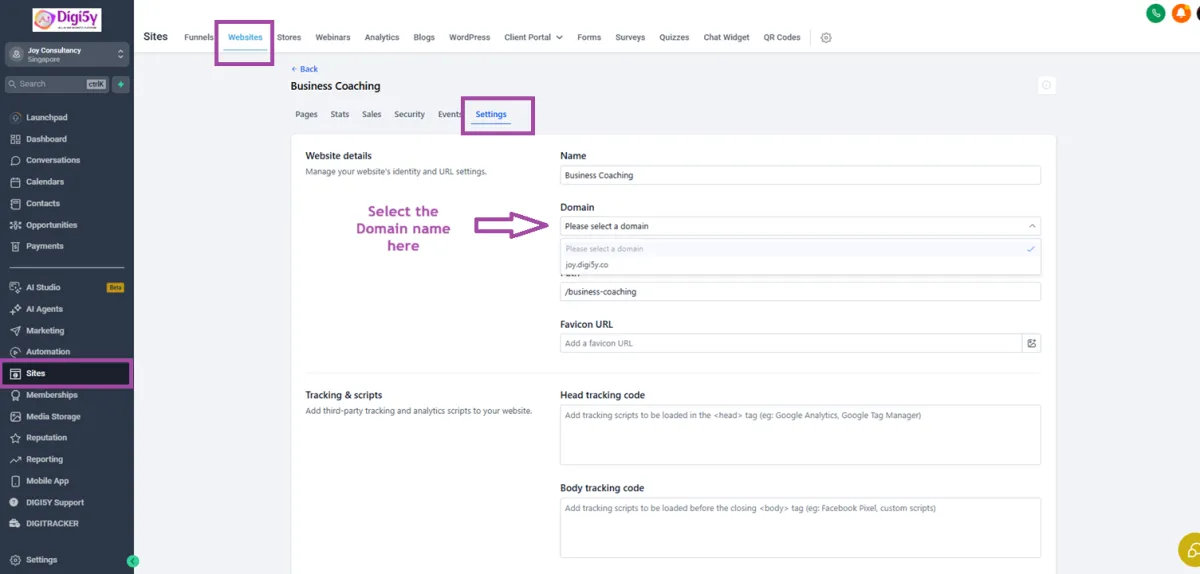
Step 5: Publish - Click Publish to make your website live on the internet.
How to Save a Header/Footer as a Global Section
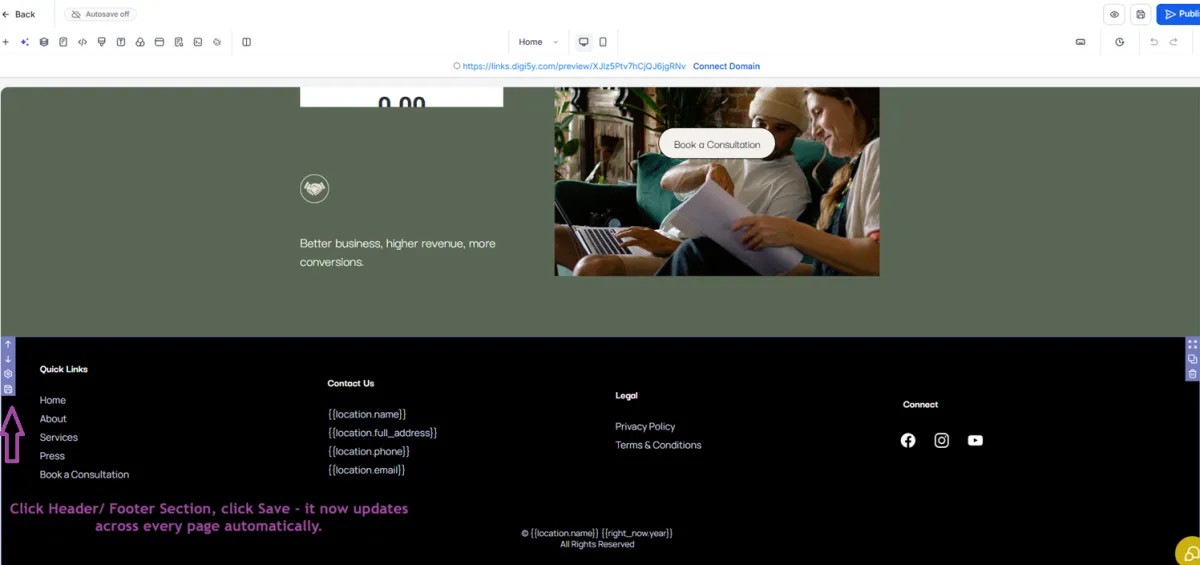
① Hover over the header or footer section you've designed.
② Click the Save icon.
③ Name the section.
④ Select "Global Section."
⑤ Click Save - it now updates across every page automatically.
Step 1: Hover Over the Section - Hover your mouse over the header or footer block you've built on the page.
Step 2: Click the Save Icon - A save icon appears on the section toolbar - click it to begin saving.
Step 3: Name & Select Type - Give the section a clear name, then select "Global Section" so it syncs across every page.
Step 4: Save - Click Save. The header/footer is now stored and ready to reuse.
How to Reuse a Saved Section
① Open the page where you want to add it.
② Click "+Add Element."
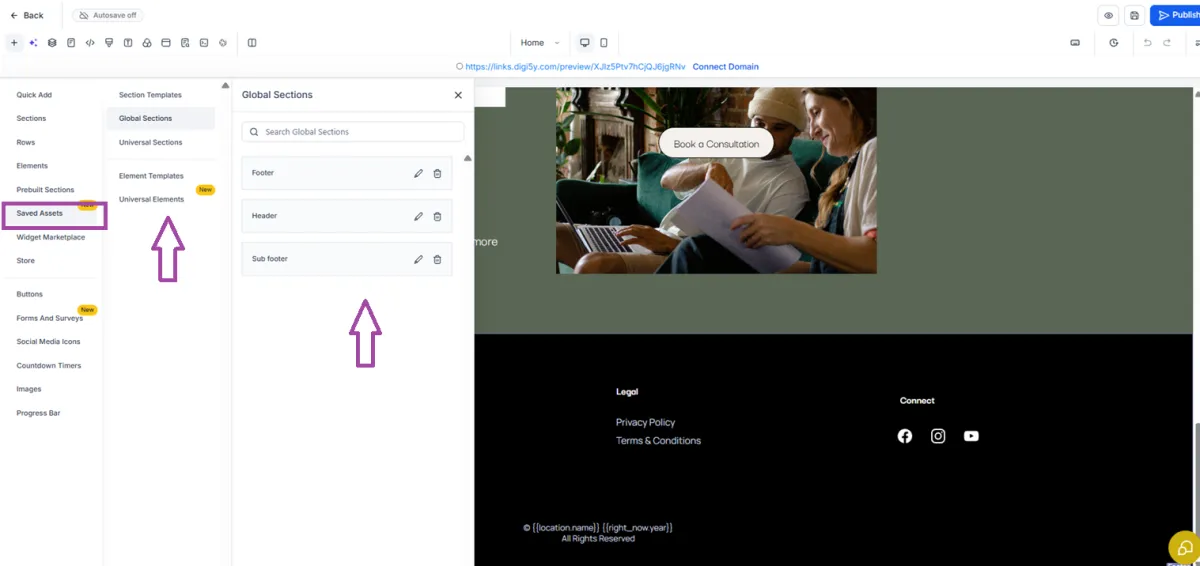
③ Select "Saved Sections."
④ Choose your saved header/footer.
⑤ It's instantly placed on the page.
Step 1: Open the Target Page - Go to the page where the saved header/footer should appear.
Step 2: Add Element - Click "+Add Element" in the top-right of the builder.
Step 3: Select Saved Sections - Choose "Saved Sections" from the element menu.
Step 4: Choose & Place - Select your saved header/footer it's placed on the page instantly. Note: Template Sections work the same way but won't auto-sync updates.
3. Funnels - Orders & Products (With or Without Payment)
Funnels let you build a sequence of pages — including checkout pages — to sell products or capture leads, connected directly to your CRM. Go to Sites → Funnels.
How to Connect Your Payment Gateway
① Go to Payments → Integrations.
② Choose Stripe or PayPal.
③ Log in and authorize the connection using your live API keys.
④ Confirm your currency settings match your target audience.
⑤ Save — your gateway is now ready to accept payments.
Step 1: Go to Integrations - Navigate to Payments → Integrations in the left sidebar.
Step 2: Connect Provider - Click Connect next to Stripe or PayPal.
Step 3: Authorize - Log in to your provider account and approve the connection.
Step 4: Set Currency - Confirm the correct currency is selected for your target market.
How to Add a Product to a Funnel
① Go to Payments → Products.
② Click "Add Product."
③ Set it as One-Time or Recurring, then enter pricing.
④ Open your Funnel Step and attach the product.
⑤ The product now appears on your Order Form.
Step 1: Go to Products - Navigate to Payments → Products in the left sidebar.
Step 2: Add a Product - Click "Add Product" and fill in the name, description, and image.
Step 3: Set Pricing - Choose One-Time or Recurring pricing, then enter the amount.
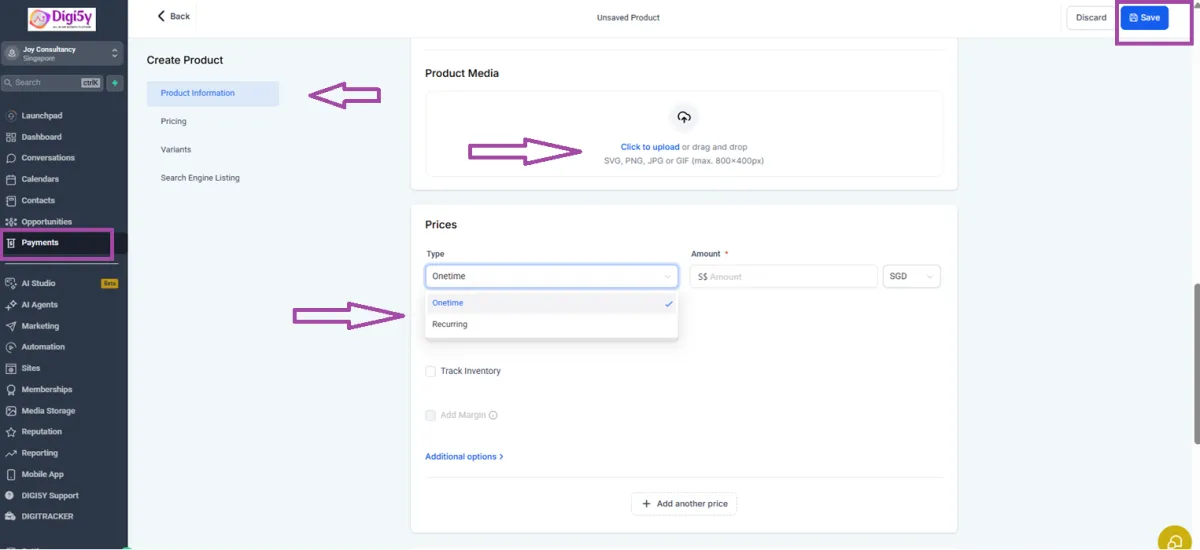
Step 4: Attach to Funnel Step - Open the relevant Funnel Step, then link the product so it's available on the order form.
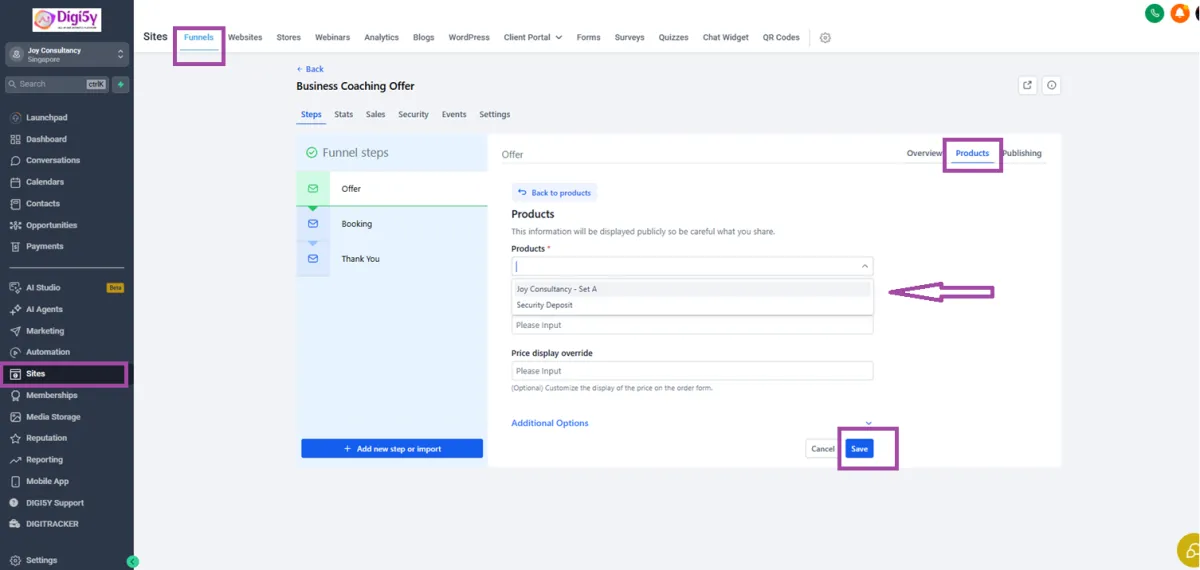
How to Set Up an Order Form (With Payment)
① Open your Funnel Step in the builder.
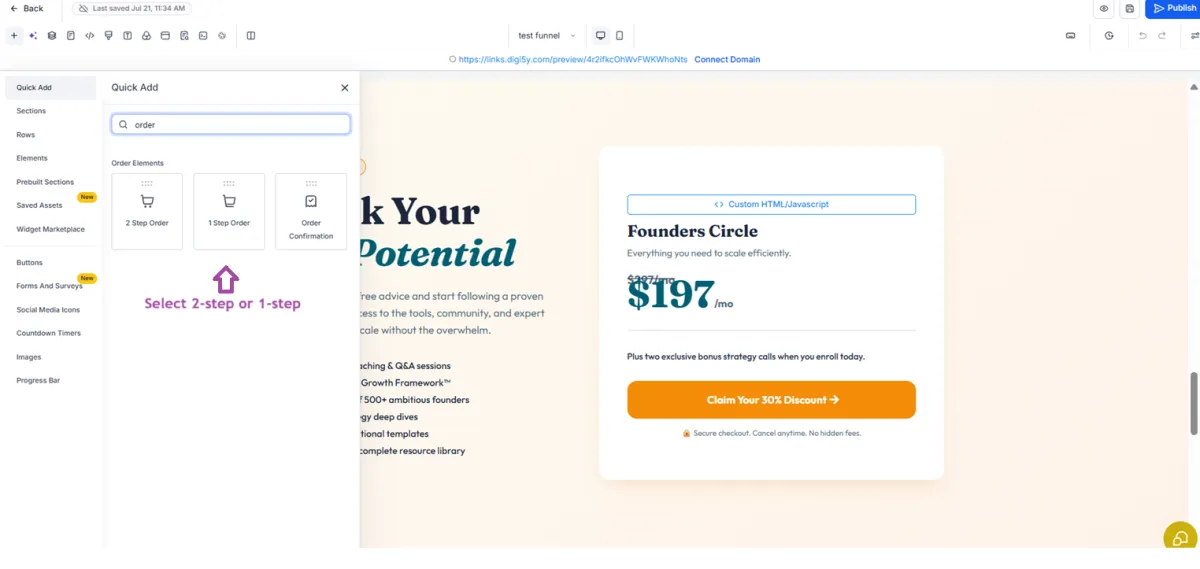
② Drag the "Order Form" element onto the page.
③ Connect your payment provider (Stripe).
④ Choose One-Step or Two-Step Order Form.
⑤ Click Publish to go live.
Step 1: Open the Funnel Step -Go to Sites → Funnels, then open the step where checkout should happen.
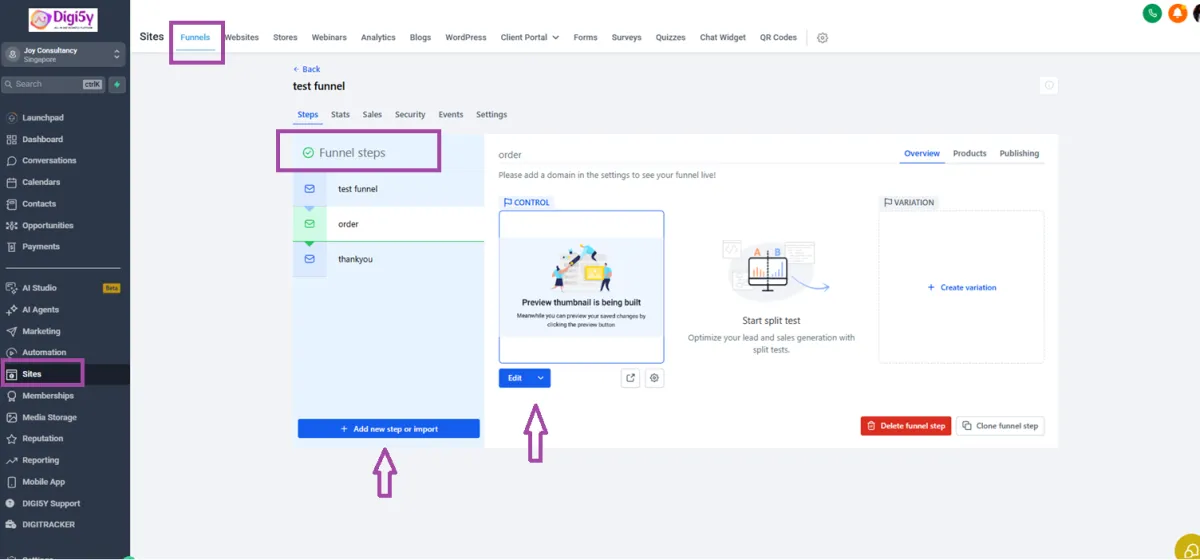
Step 2: Add the Order Form Element - Drag the "Order Form" element onto the page from the elements panel.
Step 3: Connect Payment Provider - Link your Stripe account (or other supported provider) so payments can be processed.
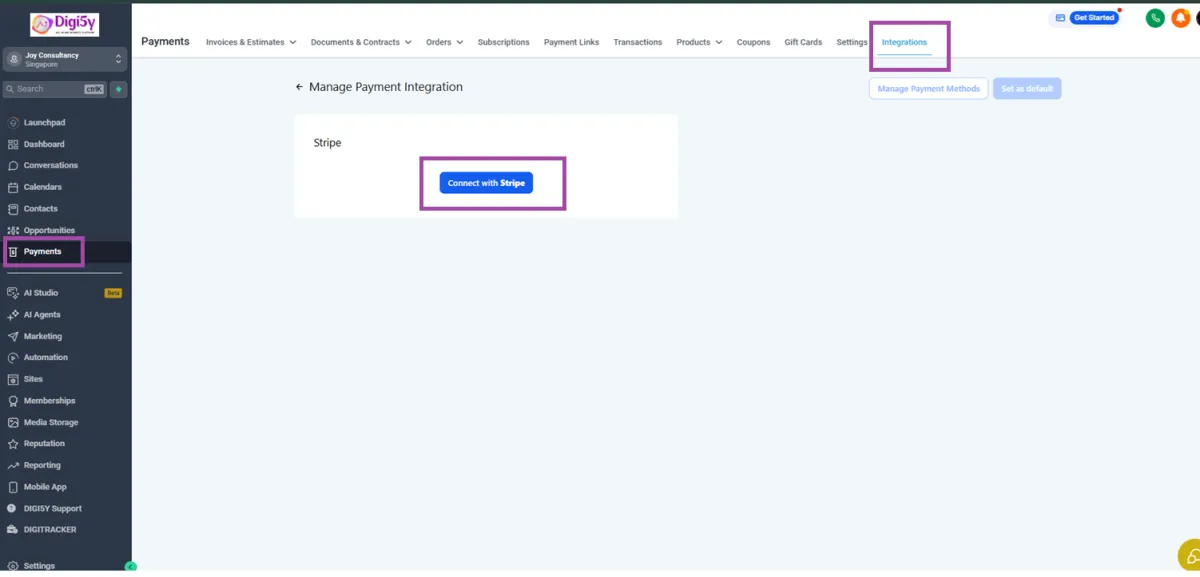
Step 4: Choose Form Type - Select One-Step (all fields on one page) or Two-Step (contact info first, payment second - better for abandoned-cart recovery). Also configure Cart Mode, Order Bumps, and Coupon Codes if needed. Click Publish
How to Capture Orders Without Payment
① Open your Funnel Step in the builder.
② Drag a standard "Form" element (no Payment Element).
③ Add the fields you need (name, email, order details).
④ Save the form.
⑤ Click Publish - leads/orders are now captured without checkout.
Step 1: Open the Funnel Step - Go to the funnel step where you want to capture the order or lead.
Step 2: Add a Standard Form - Drag a regular "Form" element onto the page - do not add the Payment Element.
Step 3: Configure Fields - Add the fields you need name, email, phone, order details, etc. and mark required fields.
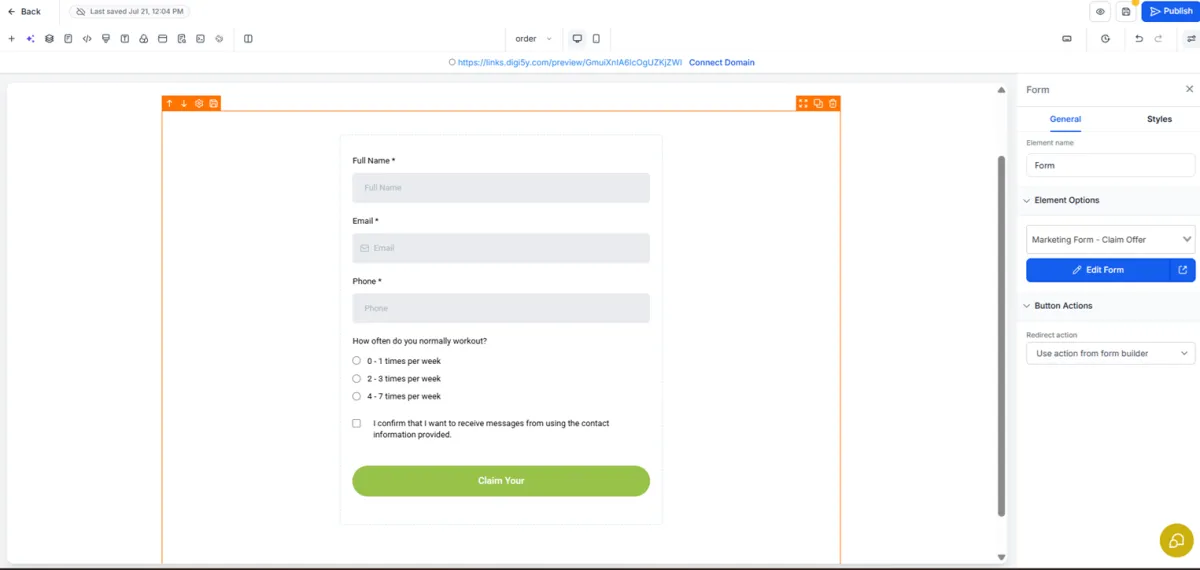
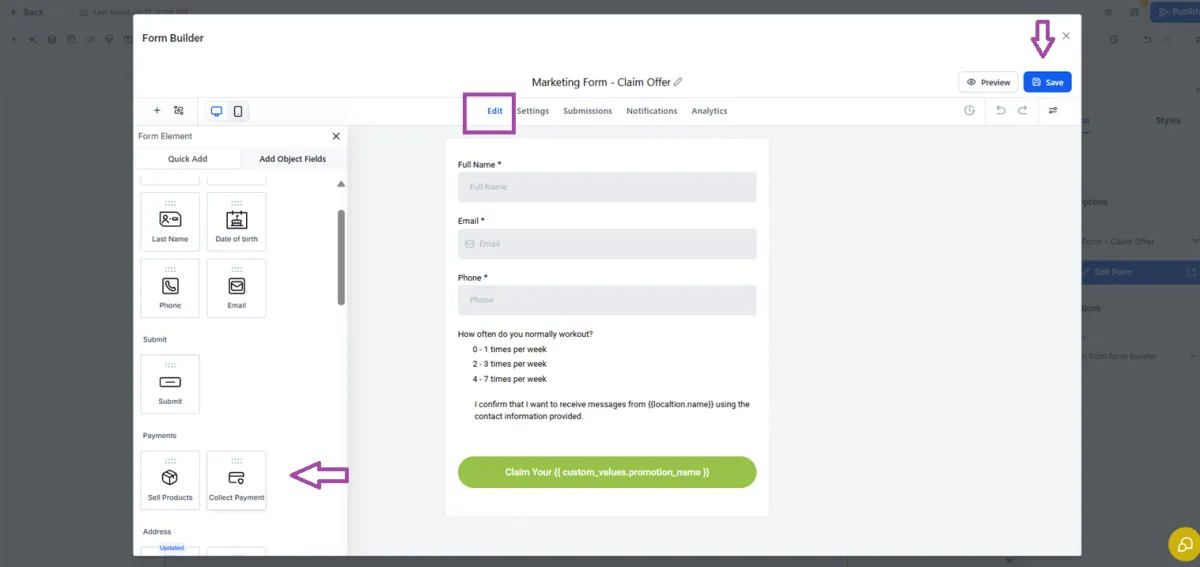
Step 4: Optional: Add Lightweight Payment - If you want a simple payment option without a full checkout flow, add a Payment Element directly inside the form (fixed price, custom price, or donation) - useful for deposits.
Step 5: Publish - Save the form, connect your domain, and click Publish to make it live.
How to Test & Publish Safely
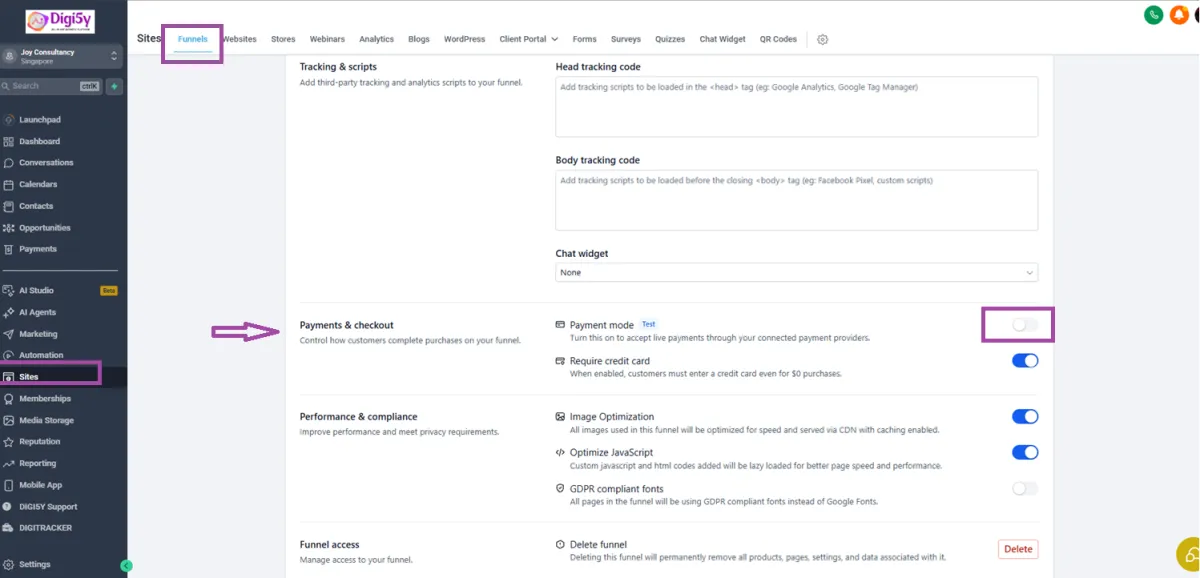
① In Funnel Settings, toggle Payment Mode from Live to Test Mode.
② Open your funnel URL in an Incognito/Private window.
③ Run a test transaction using Stripe test card 4242 4242 4242 4242.
④ Confirm the redirect and CRM contact entry both work correctly.
⑤ Switch Payment Mode back to Live, then click Publish.
Step 1: Enable Test Mode - In the funnel's Settings tab, toggle Payment Mode to Test Mode.
Step 2: Run a Test Purchase - Open the page in Incognito, complete checkout using the Stripe test card above.
Step 3: Go Live -Switch Payment Mode back to Live, then click Publish.
🎉 You're All Set!
Your domain, website, and funnels are now ready to go live. You've built the foundation your business needs to attract leads, showcase your brand, and start selling - all in one place.
Thank you for building with Digi5y!
Need Assistance?
For technical support or setup-related assistance, please contact us:

DIGI5Y is an AI-Powered All-in-one Business System, customized to provide the sales, marketing and business development activity and automation with remote specialist support at your disposal, suitable for no-tech, low-tech, and high-tech businesses.


COMPANY
INFORMATION

© Copyright Digi5y.com 2026. All rights reserved.